265 lines
10 KiB
Markdown
265 lines
10 KiB
Markdown

|
||
|
||
[文档](https://audiobookshelf.org/docs) · [用户指南](https://audiobookshelf.org/guides) · [支持](https://audiobookshelf.org/support)
|
||
|
||
# 关于
|
||
|
||
Audiobookshelf 是一个自托管的有声书和播客服务器。
|
||
|
||
### 功能
|
||
|
||
* 完全 **开源** ,包括 [Android & iOS 应用](https://github.com/advplyr/audiobookshelf-app) *(内测中)*
|
||
* 实时流式传输所有音频格式
|
||
* 搜索并添加播客以自动下载集数
|
||
* 支持多用户,并可自定义权限
|
||
* 按用户保存进度并在设备间同步
|
||
* 自动检测库更新,无需重新扫描
|
||
* 批量上传书籍和播客,支持拖放文件夹
|
||
* 备份元数据,并提供每日自动备份
|
||
* 渐进式网络应用(PWA)
|
||
* 支持通过网页和安卓应用使用 Chromecast
|
||
* 从多个来源获取元数据和封面艺术
|
||
* 章节编辑和章节查找(使用 Audnexus API)
|
||
* 将你的音频文件合并为一个 m4b 文件
|
||
* 将元数据和封面图片嵌入到你的音频文件中(使用 Tone)
|
||
* 基本的电子书支持和电子阅读器
|
||
* Epub, pdf, cbr, cbz
|
||
* 将电子书发送到设备(例如:Kindle)
|
||
* 打开播客和有声书的 RSS 订阅源
|
||
|
||
您在寻找某个功能吗? [提出来](https://github.com/advplyr/audiobookshelf/issues/new/choose)
|
||
|
||
加入我们,在 [Discord](https://discord.gg/pJsjuNCKRq) 或 [Matrix](https://matrix.to/#/#audiobookshelf:matrix.org)
|
||
|
||
### Android 应用(测试版)
|
||
|
||
在 [Google Play 商店](https://play.google.com/store/apps/details?id=com.audiobookshelf.app)试用
|
||
|
||
### iOS App(测试版)
|
||
|
||
通过 Test Flight 获取:[https://testflight.apple.com/join/wiic7QIW](https://testflight.apple.com/join/wiic7QIW) - [加入讨论](https://testflight.apple.com/join/wiic7QIW)
|
||
|
||
### 自建工具与客户端
|
||
|
||
查看 [API 文档](API 文档)
|
||
|
||

|
||
|
||
# 整理有声书
|
||
|
||
#### 目录结构和文件夹名称对 Audiobookshelf 非常重要!
|
||
|
||
请参阅[文档](https://audiobookshelf.org/docs#book-directory-structure)了解支持的目录结构、文件夹命名约定以及音频文件元数据的使用方法。
|
||
|
||
# 安装
|
||
|
||
请参阅[安装文档](https://www.audiobookshelf.org/docs)
|
||
|
||
# 反向代理设置
|
||
|
||
#### 重要!Audiobookshelf 需要建立 WebSocket 连接。
|
||
|
||
#### 注意:子文件夹路径(例如 /audiobooks)尚未支持。详见 [issue](https://github.com/advplyr/audiobookshelf/issues/385)
|
||
|
||
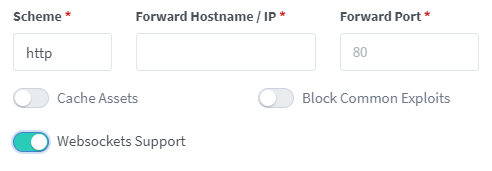
### NGINX 反向代理管理器
|
||
|
||
启用 WebSockets 支持
|
||
|
||
|
||
|
||
### NGINX 反向代理
|
||
|
||
在你的 Nginx 服务器的站点配置文件中添加以下内容,更改 <> 中的相关部分,并插入你的证书路径,然后保存文件。
|
||
|
||
```bash
|
||
server
|
||
{
|
||
listen 443 ssl;
|
||
server_name <sub>.<domain>.<tld>;
|
||
|
||
access_log /var/log/nginx/audiobookshelf.access.log;
|
||
error_log /var/log/nginx/audiobookshelf.error.log;
|
||
|
||
ssl_certificate /path/to/certificate;
|
||
ssl_certificate_key /path/to/key;
|
||
|
||
location / {
|
||
proxy_set_header X-Forwarded-For $proxy_add_x_forwarded_for;
|
||
proxy_set_header X-Forwarded-Proto $scheme;
|
||
proxy_set_header Host $host;
|
||
proxy_set_header Upgrade $http_upgrade;
|
||
proxy_set_header Connection "upgrade";
|
||
|
||
proxy_http_version 1.1;
|
||
|
||
proxy_pass http://<URL_to_forward_to>;
|
||
proxy_redirect http:// https://;
|
||
}
|
||
}
|
||
```
|
||
|
||
### Apache 反向代理
|
||
|
||
在你的 Apache 服务器的站点配置文件中添加以下内容,更改 <> 中的相关部分,并插入你的证书路径,然后保存文件。
|
||
|
||
要使此功能正常工作,你必须使用 `a2enmod` 启用以下模块中的至少一个:
|
||
|
||
* `ssl`
|
||
* `proxy`
|
||
* `proxy_http`
|
||
* `proxy_balancer`
|
||
* `proxy_wstunnel`
|
||
* `rewrite`
|
||
|
||
```bash
|
||
<IfModule mod_ssl.c>
|
||
<VirtualHost *:443>
|
||
ServerName <sub>.<domain>.<tld>
|
||
|
||
ErrorLog ${APACHE_LOG_DIR}/error.log
|
||
CustomLog ${APACHE_LOG_DIR}/access.log combined
|
||
|
||
ProxyPreserveHost On
|
||
ProxyPass / http://localhost:<audiobookshelf_port>/
|
||
RewriteEngine on
|
||
RewriteCond %{HTTP:Upgrade} websocket [NC]
|
||
RewriteCond %{HTTP:Connection} upgrade [NC]
|
||
RewriteRule ^/?(.*) "ws://localhost:<audiobookshelf_port>/$1" [P,L]
|
||
|
||
# unless you're doing something special this should be generated by a
|
||
# tool like certbot by let's encrypt
|
||
SSLCertificateFile /path/to/cert/file
|
||
SSLCertificateKeyFile /path/to/key/file
|
||
</VirtualHost>
|
||
</IfModule>
|
||
```
|
||
|
||
某些由 Let's Encrypt 签名的 SSL 证书(如 Let's Encrypt 证书)需要进行 ACME 验证。为了允许 Let's Encrypt 写入并确认 ACME 挑战,请编辑您的 VirtualHost 定义,以防止代理查询 `/.well-known` 的流量,而是直接提供这些内容:
|
||
|
||
```bash
|
||
<VirtualHost *:443>
|
||
# ...
|
||
|
||
# create the directory structure /.well-known/acme-challenges
|
||
# within DocumentRoot and give the HTTP user recursive write
|
||
# access to it.
|
||
DocumentRoot /path/to/local/directory
|
||
|
||
ProxyPreserveHost On
|
||
ProxyPass /.well-known !
|
||
ProxyPass / http://localhost:<audiobookshelf_port>/
|
||
|
||
# ...
|
||
</VirtualHost>
|
||
```
|
||
|
||
### SWAG 反向代理
|
||
|
||
[请参阅 LinuxServer.io 配置示例](https://github.com/linuxserver/reverse-proxy-confs/blob/master/audiobookshelf.subdomain.conf.sample)
|
||
|
||
### Synology 反向代理
|
||
|
||
1. 打开控制面板 > 应用程序门户
|
||
2. 切换到反向代理选项卡
|
||
3. 选择您想要启用 Websockets 的代理规则,然后点击编辑
|
||
4. 切换到“自定义标头”选项卡
|
||
5. 点击创建 > WebSocket
|
||
6. 点击保存
|
||
|
||
[来自 @silentArtifact](https://github.com/advplyr/audiobookshelf/issues/241#issuecomment-1036732329)
|
||
|
||
### [Traefik 反向代理](https://doc.traefik.io/traefik/)
|
||
|
||
与 CORS 相关的中间件会导致在登录时应用程序报告未知错误。为了避免这种情况,请不要为该站点的路由器应用以下标头:
|
||
|
||
* accessControlAllowMethods
|
||
* accessControlAllowOriginList
|
||
* accessControlMaxAge
|
||
|
||
来自 @Dondochaka 和 @BeastleeUK
|
||
|
||
### 示例 Caddyfile - [Caddy 反向代理](https://caddyserver.com/docs/caddyfile/directives/reverse_proxy)
|
||
|
||
```
|
||
subdomain.domain.com {
|
||
encode gzip zstd
|
||
reverse_proxy <LOCAL_IP>:<PORT>
|
||
}
|
||
```
|
||
|
||
# 从源代码运行
|
||
|
||
# 贡献
|
||
|
||
该应用使用 [NodeJs](https://nodejs.org/) 构建。
|
||
|
||
### Dev Container 设置
|
||
|
||
开始开发这个项目最简单的方法是使用开发容器。在 VSCode 中使用开发容器的介绍可以在这里找到 [这里](https://code.visualstudio.com/docs/devcontainers/containers) 。
|
||
|
||
所需软件:
|
||
|
||
* [Docker Desktop](https://www.docker.com/products/docker-desktop/)
|
||
* [VSCode](https://code.visualstudio.com/download)
|
||
|
||
*请注意,除了使用 Docker 作为容器软件,还可以使用其他容器软件;除了使用 VSCode 作为 IDE,还可以使用其他 IDE。然而,这种设置更为复杂,这里不予涵盖。*
|
||
|
||
在 Windows 上使用安装所需的软件
|
||
|
||
注意:这需要一个带有 winget 的 PowerShell 提示符。你应该能够复制并粘贴代码块进行安装。如果你使用的是提升的 PowerShell 提示符,安装过程中不会弹出 UAC 提示。
|
||
|
||
```PowerShell
|
||
winget install -e --id Docker.DockerDesktop; `
|
||
winget install -e --id Microsoft.VisualStudioCode
|
||
```
|
||
|
||
在 MacOS 上使用安装所需的软件
|
||
|
||
```sh
|
||
brew install --cask docker visual-studio-code
|
||
```
|
||
|
||
使用 snap 在 Linux 上安装所需的软件
|
||
|
||
```sh
|
||
sudo snap install docker;
|
||
sudo snap install code --classic
|
||
```
|
||
|
||
安装这些包后,您现在可以安装 VSCode 的 [Remote Development](https://marketplace.visualstudio.com/items?itemName=ms-vscode-remote.vscode-remote-extensionpack) 扩展。安装完此扩展后,打开命令面板(`ctrl+shift+p` 或 `cmd+shift+p`),然后选择命令 `>Dev Containers: Rebuild and Reopen in Container` 。这将导致开发环境容器被构建并启动。
|
||
|
||
现在您可以开始开发了!
|
||
|
||
### 手动设置环境
|
||
|
||
如果你不想使用开发容器,仍然可以开发这个项目。首先,你需要安装 [NodeJs](https://nodejs.org/)(版本 16)和 [FFmpeg](https://ffmpeg.org/)。
|
||
|
||
接下来,你需要在项目的根目录中创建一个 `dev.js` 文件。这个文件包含配置信息和与你的开发环境相关的路径。你可以在 `.devcontainer/dev.js` 中找到这个文件的一个示例。
|
||
|
||
你现在可以构建客户端了:
|
||
|
||
```sh
|
||
npm ci
|
||
cd client
|
||
npm ci
|
||
npm run generate
|
||
cd ..
|
||
```
|
||
|
||
### 开发命令
|
||
|
||
设置完开发环境后(无论是使用开发容器还是自定义环境),以下命令可以帮助你运行服务器和客户端。
|
||
|
||
要运行服务器,可以使用命令 ``npm run dev``。这将使用你在客户端目录中运行 ``npm run generate`` 时构建的客户端,或者在启动开发容器时构建的客户端。如果你对服务器进行了修改,需要重启服务器。如果你对客户端进行了修改,需要运行命令 ``(cd client; npm run generate)``,然后重启服务器。默认情况下,客户端运行在 ``localhost:3333``,但端口可以在 ``dev.js`` 中进行配置。
|
||
|
||
你也可以构建一个支持实时重载的客户端版本。要实现这一点,先启动服务器,然后运行命令 ``(cd client; npm run dev)``。这将在 ``localhost:3000`` 上运行一个客户端实例,并且当你对客户端进行修改时会自动更新。
|
||
|
||
如果你使用的是 VSCode,这个项目包含几个预定义的目标来加快这个过程。首先,如果你构建项目(`ctrl+shift+b` 或 `cmd+shift+b`),它会自动生成客户端。接下来,有调试命令可以运行服务器和客户端。你可以通过调试面板查看这些目标(使用 `ctrl+shift+d` 或 `cmd+shift+d` 打开调试面板):
|
||
|
||
* `Debug server`—运行服务器。
|
||
* `Debug client (nuxt)`—运行客户端并启用实时重载。
|
||
* `Debug server and client (nuxt)` —运行上述两个调试目标。
|
||
|
||
# 如何支持
|
||
|
||
[查看不完整的“支持方式”页面](https://www.audiobookshelf.org/support) |