279 lines
9.4 KiB
Markdown
279 lines
9.4 KiB
Markdown
# obsidian-remote
|
||
|
||
这个 Docker 镜像允许你在 Docker 中以容器形式运行 [obsidian](https://obsidian.md/),并通过你的 web 浏览器访问它。
|
||
|
||
请使用 `http://localhost:8080/` 在本地访问它,除非你已对其进行安全设置并清楚自己在做什么,否则不要将其暴露在网络上!
|
||
|
||
* [使用容器](#using-the-container)
|
||
* [端口](#ports)
|
||
* [映射卷](#mapped-volumes)
|
||
* [环境变量](#environment-variables)
|
||
* [使用 Docker Compose](#using-docker-compose)
|
||
* [启用 obsidian-git 插件的 GIT](#enabling-git-for-the-obsidian-git-plugin)
|
||
* [Docker CLI 示例](#docker-cli-example)
|
||
* [在浏览器中重新加载 Obsidan](#reloading-obsidan-in-the-browser)
|
||
* [设置 PUID 和 PGID](#setting-puid-and-pgid)
|
||
* [添加缺失的字体](#adding-missing-fonts)
|
||
* [使用 Docker CLI 映射字体文件](#map-font-file-using-docker-cli)
|
||
* [使用 Docker Compose 映射字体文件](#map-font-file-using-docker-compose)
|
||
* [通过反向代理托管](#hosting-behind-a-reverse-proxy)
|
||
* [Nginx 配置示例](#example-nginx-configuration)
|
||
* [通过 Nginx Proxy Manager (NPM) 托管](#hosting-behind-nginx-proxy-manager-npm)
|
||
* [更新 Obsidian](#updating-obsidian)
|
||
* [本地构建](#building-locally)
|
||
* [从外部源复制/粘贴](#copypaste-from-external-source)
|
||
|
||
## 使用容器
|
||
|
||
运行一个交互版本来测试它。这里使用的是基于 Windows 的路径,请根据您运行的操作系统进行更新。
|
||
|
||
```PowerShell
|
||
docker run --rm -it `
|
||
-v D:/ob/vaults:/vaults `
|
||
-v D:/ob/config:/config `
|
||
-p 8080:8080 `
|
||
ghcr.io/sytone/obsidian-remote:latest
|
||
```
|
||
|
||
在后台以守护进程方式运行它。
|
||
|
||
```PowerShell
|
||
docker run -d `
|
||
-v D:/ob/vaults:/vaults `
|
||
-v D:/ob/config:/config `
|
||
-p 8080:8080 `
|
||
ghcr.io/sytone/obsidian-remote:latest
|
||
```
|
||
|
||
ARM 容器现在可用,未来会使其更简单。ARM 镜像在 Docker Hub 而不在 GitHub 容器注册表中。
|
||
|
||
```PowerShell
|
||
docker run -d `
|
||
-v D:/ob/vaults:/vaults `
|
||
-v D:/ob/config:/config `
|
||
-p 8080:8080 `
|
||
sytone/obsidian-remote:latest
|
||
```
|
||
|
||
### 端口
|
||
|
||
| 端口 | 描述 |
|
||
| --- | --- |
|
||
| 8080 | HTTP Obsidian Web 界面 |
|
||
| 8443 | HTTPS Obsidian Web 界面 |
|
||
|
||
### 映射的卷
|
||
|
||
| 路径 | 描述 |
|
||
| --- | --- |
|
||
| /vaults | 主机上 Obsidian 钥匙库的位置 |
|
||
| /config | 用于存储 Obsidian 配置和 ssh 数据的位置(obsidian-git) |
|
||
|
||
### 环境变量
|
||
|
||
| 环境变量 | 描述 |
|
||
| --- | --- |
|
||
| PUID | 为容器用户设置用户 ID。默认值:911。 |
|
||
| PGID | 为容器用户设置组 ID。默认值:911。 |
|
||
| TZ | 为容器设置时区,应与您的时区匹配。默认值:Etc/UTC。请参阅 tz 数据库时区列表以获取有效选项。 |
|
||
| DOCKER\_MODS | 用于向容器添加类似 git 的模组。例如: DOCKER\_MODS=linuxserver/mods:universal-git 。请参阅 Docker Mods 以获取详细信息。 |
|
||
| KEYBOARD | 用于设置用于输入的键盘。例如:KEYBOARD=en-us-qwerty 或 KEYBOARD=de-de-qwertz,其他可能的值(未测试)可以在 https://github.com/linuxserver/docker-digikam#keyboard-layouts 找到。 |
|
||
| CUSTOM\_PORT | 容器监听的内部端口,用于 http,如果需要从默认的 3000 端口更改。 |
|
||
| CUSTOM\_HTTPS\_PORT | 容器监听的内部端口,用于 https,如果需要从默认的 3001 端口更改。 |
|
||
| CUSTOM\_USER | HTTP 基本认证用户名,默认为 abc。 |
|
||
| PASSWORD | HTTP 基本认证密码,默认为 abc。如果未设置,则无需认证。 |
|
||
| SUBFOLDER | 如果运行子文件夹反向代理,则需要在应用中创建一个子文件夹,例如 \`/subfolder/\`。 |
|
||
| TITLE | 网页浏览器中显示的页面标题,默认为“KasmVNC 客户端”。 |
|
||
| FM\_HOME | 这是文件管理器的主目录(起始目录),默认为 \`/config\`。 |
|
||
|
||
## 使用 Docker Compose
|
||
|
||
```YAML
|
||
services:
|
||
obsidian:
|
||
image: 'ghcr.io/sytone/obsidian-remote:latest'
|
||
container_name: obsidian-remote
|
||
restart: unless-stopped
|
||
ports:
|
||
- 8080:8080
|
||
- 8443:8443
|
||
volumes:
|
||
- /home/obsidian/vaults:/vaults
|
||
- /home/obsidian/config:/config
|
||
environment:
|
||
- PUID=1000
|
||
- PGID=1000
|
||
- TZ=America/Los_Angeles
|
||
- DOCKER_MODS=linuxserver/mods:universal-git
|
||
- CUSTOM_PORT="8080"
|
||
- CUSTOM_HTTPS_PORT="8443"
|
||
- CUSTOM_USER=""
|
||
- PASSWORD=""
|
||
- SUBFOLDER=""
|
||
```
|
||
|
||
## 为 obsidian-git 插件启用 GIT
|
||
|
||
此容器使用来自 linuxserver.io 的基础镜像。这意味着您可以使用 linuxserver.io 的修改。要添加对 git 的支持,请像这样添加 `DOCKER_MODS` 环境变量: `DOCKER_MODS=linuxserver/mods:universal-git` 。
|
||
|
||
### Docker CLI 示例
|
||
|
||
```PowerShell
|
||
docker run -d `
|
||
-v D:/ob/vaults:/vaults `
|
||
-v D:/ob/config:/config `
|
||
-p 8080:8080 `
|
||
-e DOCKER_MODS=linuxserver/mods:universal-git `
|
||
ghcr.io/sytone/obsidian-remote:latest
|
||
```
|
||
|
||
## 在浏览器中重新加载 Obsidan
|
||
|
||
如果您对插件进行了更改或需要重新启动 Obsidan,则无需停止并重新启动 Docker 容器,只需关闭 Obsidan UI,右键点击以显示菜单并重新打开即可。这里有一个简短的视频演示了如何操作。
|
||
|
||

|
||
|
||
## 设置 PUID 和 PGID
|
||
|
||
要设置 PUID 和 PGID,请在命令行中使用以下环境变量,默认值为 911/911
|
||
|
||
```PowerShell
|
||
docker run --rm -it `
|
||
-v D:/ob/vaults:/vaults `
|
||
-v D:/ob/config:/config `
|
||
-e PUID=1000 `
|
||
-e PGID=1000 `
|
||
-p 8080:8080 `
|
||
ghcr.io/sytone/obsidian-remote:latest
|
||
```
|
||
|
||
或者,如果你使用 docker-compose,请将它们添加到 environment 部分中:
|
||
|
||
```yaml
|
||
environment:
|
||
- PUID=1000
|
||
- PGID=1000
|
||
```
|
||
|
||
你最有可能使用自己的用户 ID,可以通过运行以下命令获取。你需要关注的两个值是 uid 和 gid。
|
||
|
||
```powershell
|
||
id $user
|
||
```
|
||
|
||
## 添加缺失的字体
|
||
|
||
感谢 @aaron-jang 提供了这个示例。
|
||
|
||
在 Obsidian 中使用所需语言的字体,请下载该字体并按如下方式添加到磁盘:
|
||
|
||
### 使用 Docker CLI 映射字体文件
|
||
|
||
```PowerShell
|
||
-v {downloaded font directory}:/usr/share/fonts/truetype/{font name}
|
||
```
|
||
|
||
### 使用 Docker Compose 映射字体文件
|
||
|
||
```PowerShell
|
||
volumes:
|
||
- {downloaded font directory}:/usr/share/fonts/truetype/{font name}
|
||
```
|
||
|
||
## 通过反向代理托管
|
||
|
||
如果您要这样做,请确保以某种方式对其进行保护!您还需要确保启用了 websocket 支持。
|
||
|
||
### Nginx 配置示例
|
||
|
||
这是一个示例,我建议使用基于 SSL 的代理和某种形式的身份验证。
|
||
|
||
```
|
||
server {
|
||
set $forward_scheme http;
|
||
set $server "10.10.10.10";
|
||
set $port 8080;
|
||
|
||
listen 80;
|
||
server_name ob.mycooldomain.com;
|
||
proxy_set_header Upgrade $http_upgrade;
|
||
proxy_set_header Connection $http_connection;
|
||
proxy_http_version 1.1;
|
||
access_log /data/logs/ob_access.log proxy;
|
||
error_log /data/logs/ob_error.log warn;
|
||
location / {
|
||
proxy_set_header Upgrade $http_upgrade;
|
||
proxy_set_header Connection $http_connection;
|
||
proxy_http_version 1.1;
|
||
# Proxy!
|
||
add_header X-Served-By $host;
|
||
proxy_set_header Host $host;
|
||
proxy_set_header X-Forwarded-Scheme $scheme;
|
||
proxy_set_header X-Forwarded-Proto $scheme;
|
||
proxy_set_header X-Forwarded-For $remote_addr;
|
||
proxy_set_header X-Real-IP $remote_addr;
|
||
proxy_pass $forward_scheme://$server:$port$request_uri;
|
||
}
|
||
}
|
||
```
|
||
|
||
## 通过 Nginx Proxy Manager (NPM) 托管
|
||
|
||
感谢 @fahrenhe1t 提供这个示例。
|
||
|
||
如果你在 Docker 中安装 obsidian-remote,可以通过 [Nginx Proxy Manager](https://nginxproxymanager.com/)(NPM - 运行在同一 Docker 实例上)代理它,并使用访问列表提供用户身份验证。obsidian-remote 容器必须与 Nginx Proxy Manager 在同一网络中。如果你不将 IP 地址暴露给容器外部,身份验证将通过 NPM 进行:
|
||
|
||
```yaml
|
||
services:
|
||
obsidian:
|
||
image: 'ghcr.io/sytone/obsidian-remote:latest'
|
||
container_name: obsidian-remote
|
||
restart: unless-stopped
|
||
ports:
|
||
- 8080 #only exposes port internally to the container
|
||
volumes:
|
||
- /home/obsidian/vaults:/vaults
|
||
- /home/obsidian/config:/config
|
||
environment:
|
||
- PUID=1000
|
||
- PGID=1000
|
||
- TZ=America/Los_Angeles
|
||
- DOCKER_MODS=linuxserver/mods:universal-git
|
||
networks:
|
||
default:
|
||
name: <your nginx proxy manager network>
|
||
external: true
|
||
```
|
||
|
||
在 NPM 中创建一个代理主机,指向 "obsidian-remote:8080" 容器,选择你的域名,使用 Let's Encrypt SSL 证书,启用 WebSocket。这个视频对此进行了说明:[Nginx Proxy Manager - ACCESS LIST 保护内部服务](https://www.youtube.com/watch?v=G9voYZejH48)
|
||
|
||
## 更新 Obsidian
|
||
|
||
obsidian 默认会在容器内更新自身。如果你重新创建容器,就需要再次进行更新。该仓库会定期更新,以保持与最新版本的 obsidian 同步。
|
||
|
||
## 本地构建
|
||
|
||
要本地构建和使用它,请运行以下命令:
|
||
|
||
```PowerShell
|
||
docker build --pull --rm `
|
||
-f "Dockerfile" `
|
||
-t obsidian-remote:latest `
|
||
"."
|
||
```
|
||
|
||
要运行本地构建的镜像,请运行以下命令:
|
||
|
||
```PowerShell
|
||
docker run --rm -it `
|
||
-v D:/ob/vaults:/vaults `
|
||
-v D:/ob/config:/config `
|
||
-p 8080:8080 `
|
||
obsidian-remote:latest bash
|
||
```
|
||
|
||
## 从外部源复制/粘贴
|
||
|
||
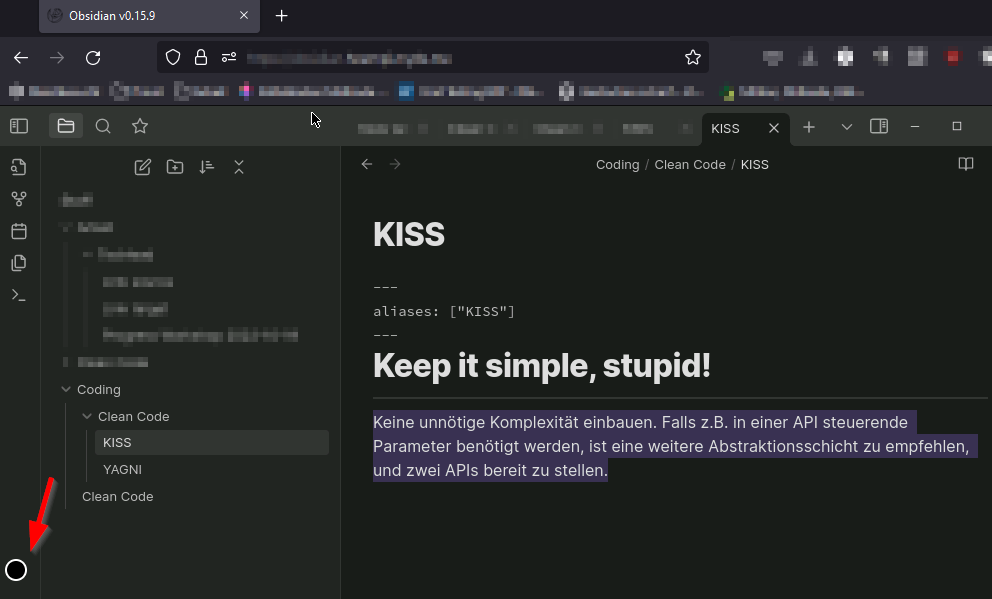
点击浏览器窗口左侧的圆圈。在那里,您可以找到用于更新远程剪贴板或从中复制的内容的文本框。
|
||
|
||
 |