32 KiB
frp


金牌赞助商


什么是 frp?
frp 是一个快速的逆向代理,允许您将位于 NAT 或防火墙后面的本地服务器暴露给互联网。它目前支持 TCP 和 UDP,以及 HTTP 和 HTTPS 协议,使得请求可以通过域名转发到内部服务。
frp 还提供了一种 P2P 连接模式。
目录
- frp
- 什么是 frp?
- 目录
- 开发状态
- 架构
- 示例用法
- 功能
- 发展计划
- 贡献
- 捐赠
开发状态
frp 目前正在开发中。您可以在 master 分支尝试最新的发布版本,或者使用 dev 分支访问正在开发中的版本。
我们目前正在开发版本2,并尝试进行一些代码重构和改进。但是请注意,它将不与版本1兼容。
我们将从版本0过渡到版本1,届时将只接受错误修复和改进,而不是大的功能请求。
架构
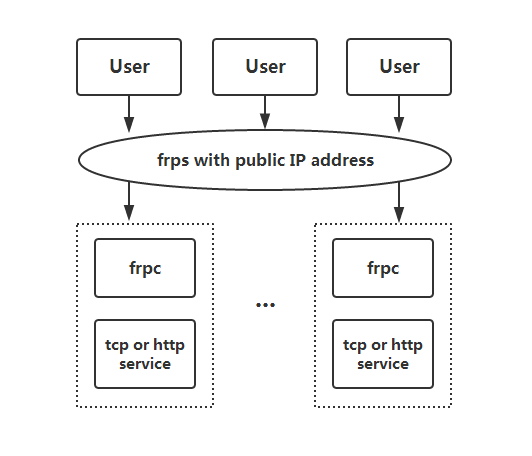
示例用法
首先,从发布页面下载适用于您操作系统和架构的最新程序。
接下来,将 frps 二进制文件和 frps.ini 配置文件放置在具有公网 IP 地址的服务器 A 上。
最后,将 frpc 二进制文件和 frpc.ini 配置文件放置在位于无法从公网直接访问的局域网上的服务器 B 上。
通过 SSH 在局域网内访问您的计算机
- 在服务器 A 上修改
frps.ini,设置bind_port以便 frp 客户端连接:
# frps.ini
[common]
bind_port = 7000
- 在服务器 A 上启动
frps:
./frps -c ./frps.ini
- 在服务器 B 上修改
frpc.ini,并将server_addr字段设置为您的 frps 服务器的公网 IP 地址:
# frpc.ini
[common]
server_addr = x.x.x.x
server_port = 7000

[ssh]
type = tcp
local_ip = 127.0.0.1
local_port = 22
remote_port = 6000
请注意,local_port(客户端监听)和 remote_port(服务器上暴露)用于 frp 系统中的进出流量,而 server_port 用于 frps 和 frpc 之间的通信。
- 在服务器 B 上启动
frpc:
./frpc -c ./frpc.ini
- 要从另一台机器通过服务器 A 通过 SSH 访问服务器 B(假设用户名为
test),请使用以下命令:
ssh -oPort=6000 test@x.x.x.x
在局域网中使用自定义域名访问内部 Web 服务
有时我们需要将位于 NAT 网络背后的本地 Web 服务暴露给其他人,以便使用自己的域名进行测试。
不幸的是,我们无法将域名解析为本地 IP。然而,我们可以使用 frp 来暴露 HTTP(S)服务。
- 修改
frps.ini并将 vhost 的 HTTP 端口设置为 8080:
# frps.ini
[common]
bind_port = 7000
vhost_http_port = 8080
- 启动
frps:
./frps -c ./frps.ini
- 修改
frpc.ini并将server_addr设置为远程 frps 服务器的 IP 地址。指定您的 Web 服务的local_port:
# frpc.ini
[common]
server_addr = x.x.x.x
server_port = 7000

[web]
type = http
local_port = 80
custom_domains = www.example.com
- 启动
frpc:
./frpc -c ./frpc.ini
-
将
www.example.com的 A 记录映射到远程 frps 服务器的公网 IP 地址或指向您原始域名的 CNAME 记录。 -
使用 url
http://www.example.com:8080访问您的本地 Web 服务。
转发 DNS 查询请求
- 修改
frps.ini:
# frps.ini
[common]
bind_port = 7000
- 启动
frps:
./frps -c ./frps.ini
- 修改
frpc.ini并将server_addr设置为远程 frps 服务器的 IP 地址。将 DNS 查询请求转发到谷歌公共 DNS 服务器8.8.8.8:53:
# frpc.ini
[common]
server_addr = x.x.x.x
server_port = 7000

[dns]
type = udp
local_ip = 8.8.8.8
local_port = 53
remote_port = 6000
- 启动 frpc:
./frpc -c ./frpc.ini
- 使用
dig命令测试 DNS 解析:
dig @x.x.x.x -p 6000 www.google.com
转发 Unix 域套接字
将 Unix 域套接字(例如 Docker 守护进程套接字)暴露为 TCP。
配置 frps 如上所述。
- 使用以下配置启动
frpc:
# frpc.ini
[common]
server_addr = x.x.x.x
server_port = 7000

[unix_domain_socket]
type = tcp
remote_port = 6000
plugin = unix_domain_socket
plugin_unix_path = /var/run/docker.sock
- 使用
curl获取 docker 版本以测试配置:
curl http://x.x.x.x:6000/version
公开一个简单的 HTTP 文件服务器
暴露一个简单的 HTTP 文件服务器,以便从公网访问局域网中存储的文件。
按照上述说明配置 frps,然后:
- 使用以下配置启动
frpc:
# frpc.ini
[common]
server_addr = x.x.x.x
server_port = 7000

[test_static_file]
type = tcp
remote_port = 6000
plugin = static_file
plugin_local_path = /tmp/files
plugin_strip_prefix = static
plugin_http_user = abc
plugin_http_passwd = abc
- 使用浏览器访问
http://x.x.x.x:6000/static/,并指定正确的用户名和密码,以查看frpc机器上的/tmp/files目录中的文件。
启用本地 HTTP(S)服务的 HTTPS
您可以将插件中的 https2https 替换,并将 plugin_local_addr 指向一个 HTTPS 端点。
- 使用以下配置启动
frpc:
# frpc.ini
[common]
server_addr = x.x.x.x
server_port = 7000

[test_https2http]
type = https
custom_domains = test.example.com

plugin = https2http
plugin_local_addr = 127.0.0.1:80
plugin_crt_path = ./server.crt
plugin_key_path = ./server.key
plugin_host_header_rewrite = 127.0.0.1
plugin_header_X-From-Where = frp
- 访问
https://test.example.com。
私密地公开您的服务
为了减轻直接将某些服务暴露给公共网络所带来的风险,STCP(秘密 TCP)模式要求使用预共享密钥,以便其他客户端访问该服务。
配置与上述相同的 frps。
- 在机器 B 上使用以下配置启动
frpc。此示例用于公开 SSH 服务(端口 22),请注意预共享密钥的字段sk,以及这里已移除的remote_port字段:
# frpc.ini
[common]
server_addr = x.x.x.x
server_port = 7000

[secret_ssh]
type = stcp
sk = abcdefg
local_ip = 127.0.0.1
local_port = 22
- 启动另一个
frpc(通常在另一台机器 C 上)以以下配置使用安全密钥(sk字段)访问 SSH 服务:
# frpc.ini
[common]
server_addr = x.x.x.x
server_port = 7000

[secret_ssh_visitor]
type = stcp
role = visitor
server_name = secret_ssh
sk = abcdefg
bind_addr = 127.0.0.1
bind_port = 6000
- 在机器 C 上,使用以下命令连接到机器 B 的 SSH:
ssh -oPort=6000 127.0.0.1
P2P 模式
xtcp 旨在在客户端之间直接传输大量数据。仍然需要一个 frps 服务器,因为这里的 P2P 仅指实际的数据传输。
Note that it may not work with all types of NAT devices. You might want to fallback to stcp if xtcp doesn't work.
- In
frps.iniconfigure a UDP port for xtcp:
# frps.ini
bind_udp_port = 7001
- Start
frpcon machine B, and expose the SSH port. Note that theremote_portfield is removed:
# frpc.ini
[common]
server_addr = x.x.x.x
server_port = 7000

[p2p_ssh]
type = xtcp
sk = abcdefg
local_ip = 127.0.0.1
local_port = 22
- Start another
frpc(typically on another machine C) with the configuration to connect to SSH using P2P mode:
# frpc.ini
[common]
server_addr = x.x.x.x
server_port = 7000

[p2p_ssh_visitor]
type = xtcp
role = visitor
server_name = p2p_ssh
sk = abcdefg
bind_addr = 127.0.0.1
bind_port = 6000
- 在机器 C 上,使用以下命令连接到机器 B 的 SSH:
ssh -oPort=6000 127.0.0.1
功能
配置文件
阅读完整的示例配置文件,以了解更多此处未描述的功能。
使用环境变量
配置文件中可以使用 Go 的标准格式引用环境变量:
# frpc.ini
[common]
server_addr = {{ .Envs.FRP_SERVER_ADDR }}
server_port = 7000

[ssh]
type = tcp
local_ip = 127.0.0.1
local_port = 22
remote_port = {{ .Envs.FRP_SSH_REMOTE_PORT }}
使用上述配置,可以将变量传递给 frpc 程序,如下所示:
export FRP_SERVER_ADDR="x.x.x.x"
export FRP_SSH_REMOTE_PORT="6000"
./frpc -c ./frpc.ini
frpc 将使用操作系统环境变量渲染配置文件模板。请记住,在您的引用前加上 .Envs。
将配置文件拆分为不同的文件
您可以将多个代理配置拆分为不同的文件,并在主文件中包含它们。
# frpc.ini
[common]
server_addr = x.x.x.x
server_port = 7000
includes=./confd/*.ini
# ./confd/test.ini
[ssh]
type = tcp
local_ip = 127.0.0.1
local_port = 22
remote_port = 6000
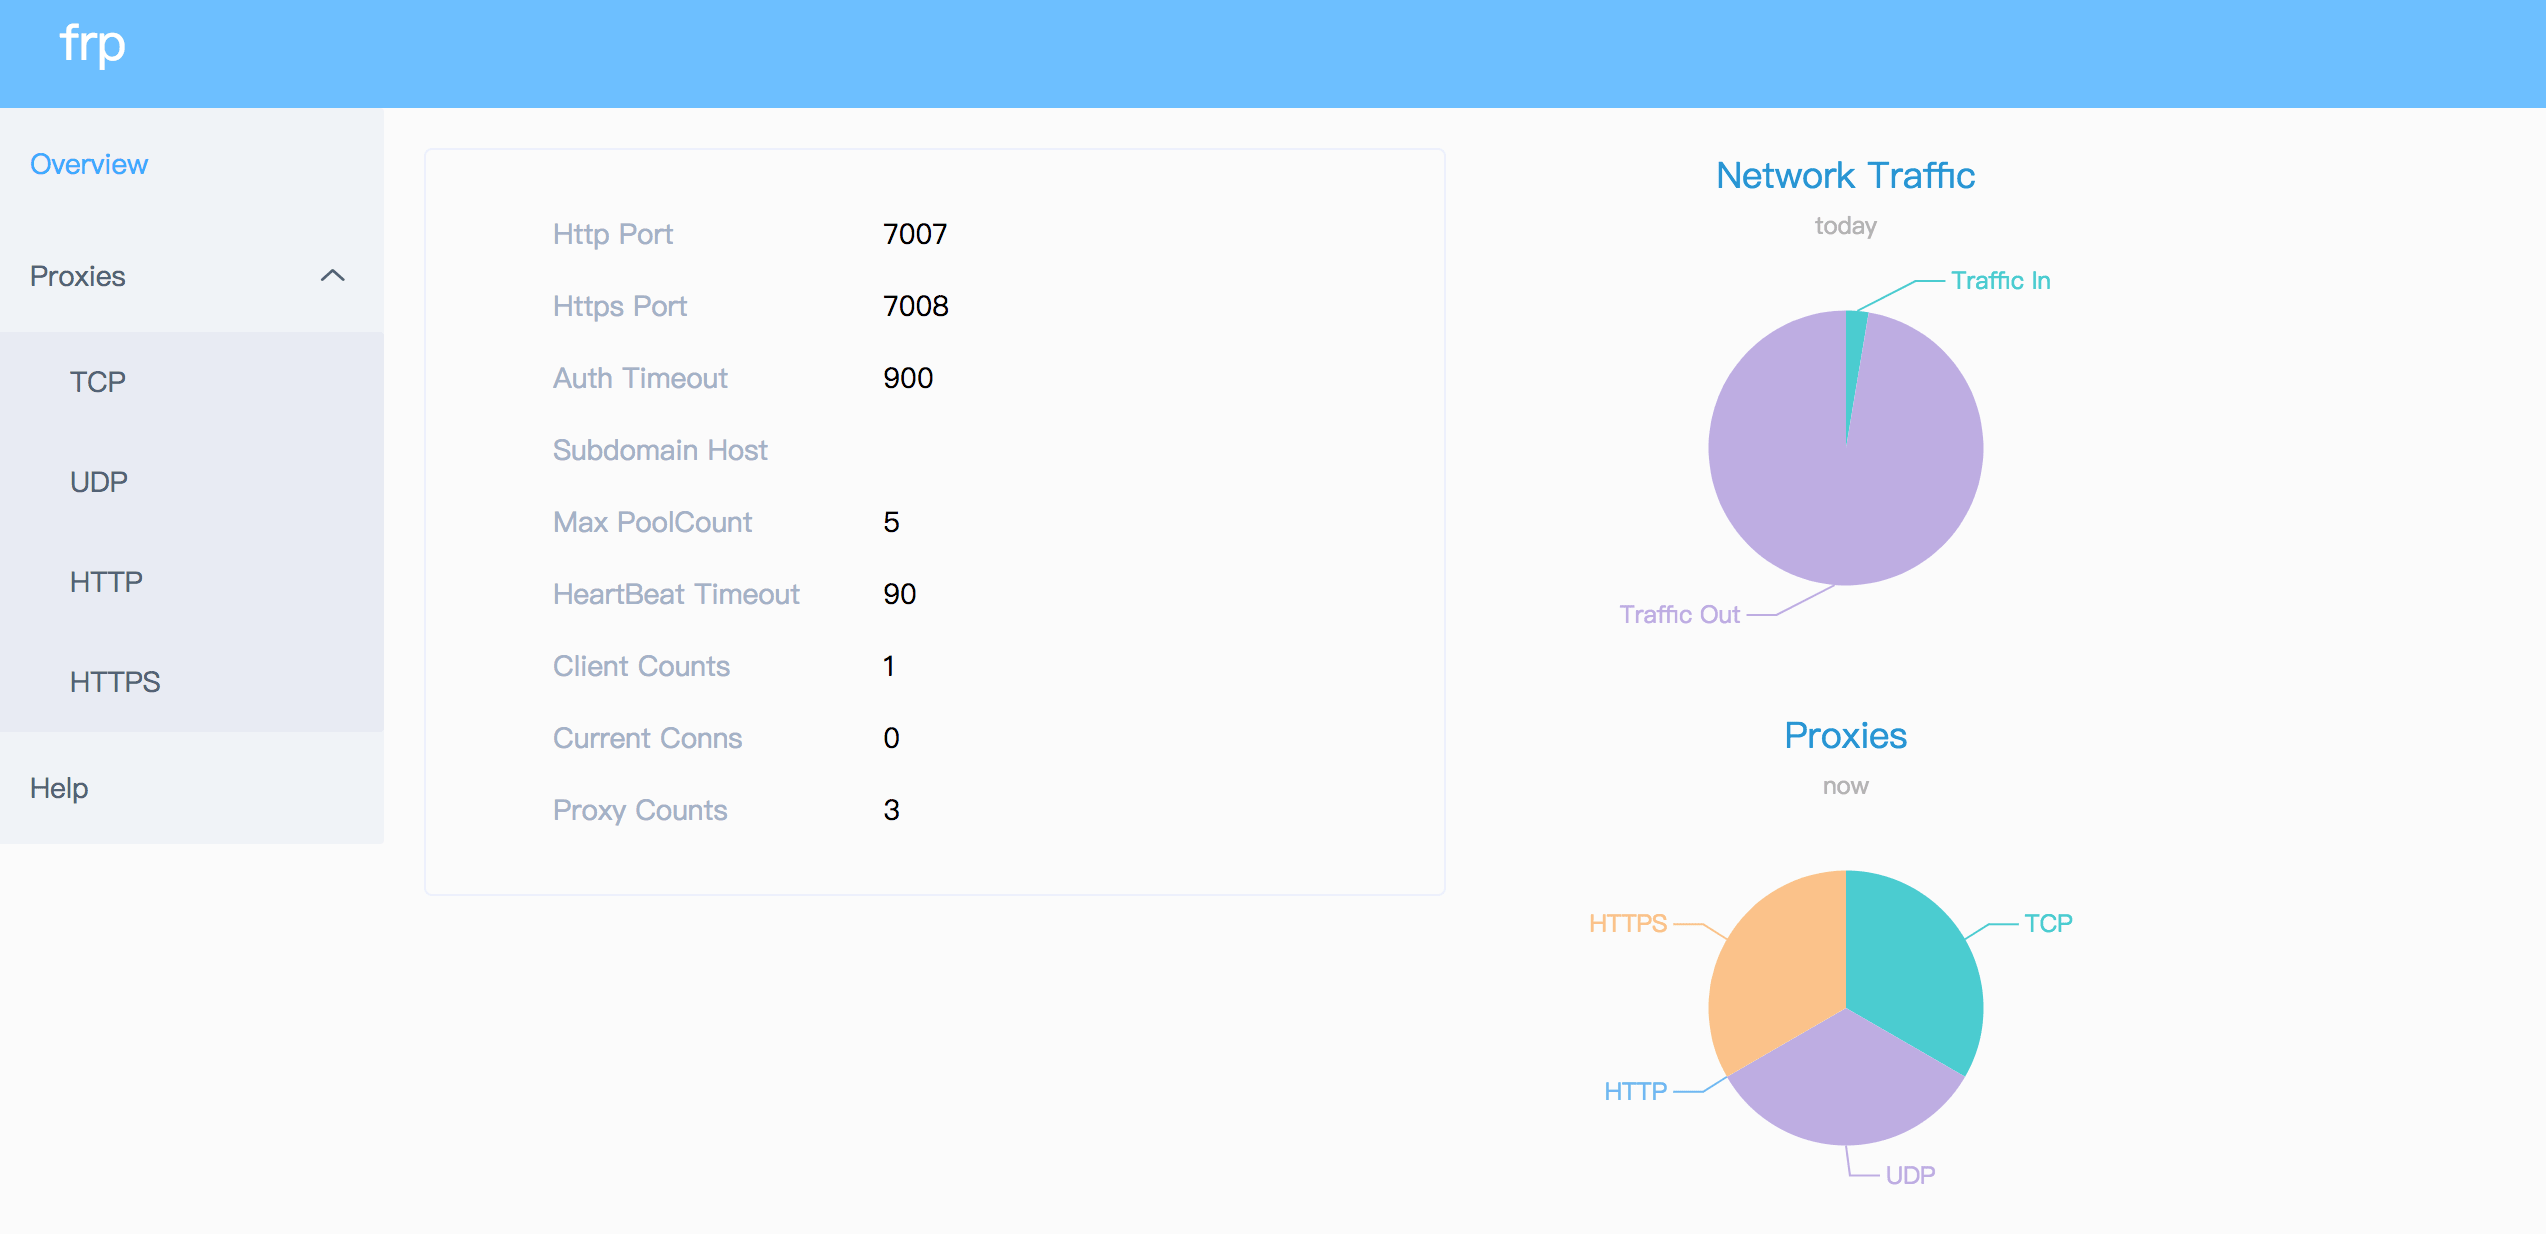
仪表板
通过仪表板检查 frp 的状态和代理的统计信息。
配置仪表板的端口以启用此功能:
[common]
dashboard_port = 7500
# dashboard's username and password are both optional
dashboard_user = admin
dashboard_pwd = admin
然后访问 http://[服务器地址]:7500 查看仪表板,用户名和密码均为 admin。
此外,您还可以通过使用您的域名通配符或普通 SSL 证书来使用 HTTPS 端口:
[common]
dashboard_port = 7500
# dashboard's username and password are both optional
dashboard_user = admin
dashboard_pwd = admin
dashboard_tls_mode = true
dashboard_tls_cert_file = server.crt
dashboard_tls_key_file = server.key
然后访问 https://[服务器地址]:7500 以安全 HTTPS 连接查看仪表板,用户名和密码均为 admin。
管理员界面
管理员界面帮助您检查和管理 frpc 的配置。
配置管理员界面的地址以启用此功能:
[common]
admin_addr = 127.0.0.1
admin_port = 7400
admin_user = admin
admin_pwd = admin
然后访问 http://127.0.0.1:7400 查看管理界面,用户名和密码都为 admin。
监控
当启用仪表板时,frps 将监控数据保存在缓存中。进程重启后将被清除。
也支持 Prometheus。
Prometheus
首先启用仪表板,然后在 frps.ini 中配置 enable_prometheus = true。
http://{dashboard_addr}/metrics 将提供 Prometheus 监控数据。
客户端认证
有 2 种认证方法用于认证 frpc 与 frps。
You can decide which one to use by configuring authentication_method under [common] in frpc.ini and frps.ini.
Configuring authenticate_heartbeats = true under [common] will use the configured authentication method to add and validate authentication on every heartbeat between frpc and frps.
Configuring authenticate_new_work_conns = true under [common] will do the same for every new work connection between frpc and frps.
Token Authentication
When specifying authentication_method = token under [common] in frpc.ini and frps.ini - token based authentication will be used.
Make sure to specify the same token in the [common] section in frps.ini and frpc.ini for frpc to pass frps validation
OIDC Authentication
When specifying authentication_method = oidc under [common] in frpc.ini and frps.ini - OIDC based authentication will be used.
OIDC 代表 OpenID Connect,所使用的流程称为客户端凭证授权 。
要使用此认证类型 - 按照以下方式配置 frpc.ini 和 frps.ini:
# frps.ini
[common]
authentication_method = oidc
oidc_issuer = https://example-oidc-issuer.com/
oidc_audience = https://oidc-audience.com/.default
# frpc.ini
[common]
authentication_method = oidc
oidc_client_id = 98692467-37de-409a-9fac-bb2585826f18 # Replace with OIDC client ID
oidc_client_secret = oidc_secret
oidc_audience = https://oidc-audience.com/.default
oidc_token_endpoint_url = https://example-oidc-endpoint.com/oauth2/v2.0/token
加密和压缩
这些功能默认是关闭的。您可以选择开启加密和/或压缩:
# frpc.ini
[ssh]
type = tcp
local_port = 22
remote_port = 6000
use_encryption = true
use_compression = true
TLS
frp supports the TLS protocol between frpc and frps since v0.25.0.
For port multiplexing, frp sends a first byte 0x17 to dial a TLS connection.
Configure tls_enable = true in the [common] section to frpc.ini to enable this feature.
To enforce frps to only accept TLS connections - configure tls_only = true in the [common] section in frps.ini. This is optional.
frpc TLS settings (under the [common] section):
tls_enable = true
tls_cert_file = certificate.crt
tls_key_file = certificate.key
tls_trusted_ca_file = ca.crt
frps TLS settings (under the [common] section):
tls_only = true
tls_enable = true
tls_cert_file = certificate.crt
tls_key_file = certificate.key
tls_trusted_ca_file = ca.crt
You will need a root CA cert and at least one SSL/TLS certificate. It can be self-signed or regular (such as Let's Encrypt or another SSL/TLS certificate provider).
If you using frp via IP address and not hostname, make sure to set the appropriate IP address in the Subject Alternative Name (SAN) area when generating SSL/TLS Certificates.
Given an example:
- Prepare openssl config file. It exists at
/etc/pki/tls/openssl.cnfin Linux System and/System/Library/OpenSSL/openssl.cnfin MacOS, and you can copy it to current path, likecp /etc/pki/tls/openssl.cnf ./my-openssl.cnf. If not, you can build it by yourself, like:
cat > my-openssl.cnf << EOF
[ ca ]
default_ca = CA_default
[ CA_default ]
x509_extensions = usr_cert
[ req ]
default_bits        = 2048
default_md          = sha256
default_keyfile     = privkey.pem
distinguished_name  = req_distinguished_name
attributes          = req_attributes
x509_extensions     = v3_ca
string_mask         = utf8only
[ req_distinguished_name ]
[ req_attributes ]
[ usr_cert ]
basicConstraints       = CA:FALSE
nsComment              = "OpenSSL Generated Certificate"
subjectKeyIdentifier   = hash
authorityKeyIdentifier = keyid,issuer
[ v3_ca ]
subjectKeyIdentifier   = hash
authorityKeyIdentifier = keyid:always,issuer
basicConstraints       = CA:true
EOF
- build ca certificates:
openssl genrsa -out ca.key 2048
openssl req -x509 -new -nodes -key ca.key -subj "/CN=example.ca.com" -days 5000 -out ca.crt
- 构建 frps 证书:
openssl genrsa -out server.key 2048

openssl req -new -sha256 -key server.key \
    -subj "/C=XX/ST=DEFAULT/L=DEFAULT/O=DEFAULT/CN=server.com" \
    -reqexts SAN \
    -config <(cat my-openssl.cnf <(printf "\n[SAN]\nsubjectAltName=DNS:localhost,IP:127.0.0.1,DNS:example.server.com")) \
    -out server.csr

openssl x509 -req -days 365 -sha256 \
	-in server.csr -CA ca.crt -CAkey ca.key -CAcreateserial \
	-extfile <(printf "subjectAltName=DNS:localhost,IP:127.0.0.1,DNS:example.server.com") \
	-out server.crt
- 构建 frpc 证书:
openssl genrsa -out client.key 2048
openssl req -new -sha256 -key client.key \
    -subj "/C=XX/ST=DEFAULT/L=DEFAULT/O=DEFAULT/CN=client.com" \
    -reqexts SAN \
    -config <(cat my-openssl.cnf <(printf "\n[SAN]\nsubjectAltName=DNS:client.com,DNS:example.client.com")) \
    -out client.csr

openssl x509 -req -days 365 -sha256 \
    -in client.csr -CA ca.crt -CAkey ca.key -CAcreateserial \
	-extfile <(printf "subjectAltName=DNS:client.com,DNS:example.client.com") \
	-out client.crt
热重载 frpc 配置
要启用 HTTP API,需要填写 admin_addr 和 admin_port 字段
# frpc.ini
[common]
admin_addr = 127.0.0.1
admin_port = 7400
Then run command frpc reload -c ./frpc.ini and wait for about 10 seconds to let frpc create or update or remove proxies.
Note that parameters in [common] section won't be modified except 'start'.
You can run command frpc verify -c ./frpc.ini before reloading to check if there are config errors.
Get proxy status from client
Use frpc status -c ./frpc.ini to get status of all proxies. The admin_addr and admin_port fields are required for enabling HTTP API.
Only allowing certain ports on the server
allow_ports in frps.ini is used to avoid abuse of ports:
# frps.ini
[common]
allow_ports = 2000-3000,3001,3003,4000-50000
allow_ports consists of specific ports or port ranges (lowest port number, dash -, highest port number), separated by comma ,.
Port Reuse
vhost_http_port and vhost_https_port in frps can use same port with bind_port. frps will detect the connection's protocol and handle it correspondingly.
We would like to try to allow multiple proxies bind a same remote port with different protocols in the future.
Bandwidth Limit
For Each Proxy
# frpc.ini
[ssh]
type = tcp
local_port = 22
remote_port = 6000
bandwidth_limit = 1MB
Set bandwidth_limit in each proxy's configure to enable this feature. Supported units are MB and KB.
Set bandwidth_limit_mode to client or server to limit bandwidth on the client or server side. Default is client.
TCP Stream Multiplexing
frp supports tcp stream multiplexing since v0.10.0 like HTTP2 Multiplexing, in which case all logic connections to the same frpc are multiplexed into the same TCP connection.
You can disable this feature by modify frps.ini and frpc.ini:
# frps.ini and frpc.ini, must be same
[common]
tcp_mux = false
Support KCP Protocol
KCP is a fast and reliable protocol that can achieve the transmission effect of a reduction of the average latency by 30% to 40% and reduction of the maximum delay by a factor of three, at the cost of 10% to 20% more bandwidth wasted than TCP.
KCP mode uses UDP as the underlying transport. Using KCP in frp:
- Enable KCP in frps:
# frps.ini
[common]
bind_port = 7000
# Specify a UDP port for KCP.
kcp_bind_port = 7000
The kcp_bind_port number can be the same number as bind_port, since bind_port field specifies a TCP port.
- Configure
frpc.inito use KCP to connect to frps:
# frpc.ini
[common]
server_addr = x.x.x.x
# Same as the 'kcp_bind_port' in frps.ini
server_port = 7000
protocol = kcp
Support QUIC Protocol
QUIC is a new multiplexed transport built on top of UDP.
Using QUIC in frp:
- Enable QUIC in frps:
# frps.ini
[common]
bind_port = 7000
# Specify a UDP port for QUIC.
quic_bind_port = 7000
The quic_bind_port number can be the same number as bind_port, since bind_port field specifies a TCP port.
- Configure
frpc.inito use QUIC to connect to frps:
# frpc.ini
[common]
server_addr = x.x.x.x
# Same as the 'quic_bind_port' in frps.ini
server_port = 7000
protocol = quic
Connection Pooling
By default, frps creates a new frpc connection to the backend service upon a user request. With connection pooling, frps keeps a certain number of pre-established connections, reducing the time needed to establish a connection.
This feature is suitable for a large number of short connections.
- Configure the limit of pool count each proxy can use in
frps.ini:
# frps.ini
[common]
max_pool_count = 5
- Enable and specify the number of connection pool:
# frpc.ini
[common]
pool_count = 1
Load balancing
Load balancing is supported by group.
This feature is only available for types tcp, http, tcpmux now.
# frpc.ini
[test1]
type = tcp
local_port = 8080
remote_port = 80
group = web
group_key = 123

[test2]
type = tcp
local_port = 8081
remote_port = 80
group = web
group_key = 123
group_key is used for authentication.
Connections to port 80 will be dispatched to proxies in the same group randomly.
For type tcp, remote_port in the same group should be the same.
For type http, custom_domains, subdomain, locations should be the same.
Service Health Check
Health check feature can help you achieve high availability with load balancing.
Add health_check_type = tcp or health_check_type = http to enable health check.
With health check type tcp, the service port will be pinged (TCPing):
# frpc.ini
[test1]
type = tcp
local_port = 22
remote_port = 6000
# Enable TCP health check
health_check_type = tcp
# TCPing timeout seconds
health_check_timeout_s = 3
# If health check failed 3 times in a row, the proxy will be removed from frps
health_check_max_failed = 3
# A health check every 10 seconds
health_check_interval_s = 10
With health check type http, an HTTP request will be sent to the service and an HTTP 2xx OK response is expected:
# frpc.ini
[web]
type = http
local_ip = 127.0.0.1
local_port = 80
custom_domains = test.example.com
# Enable HTTP health check
health_check_type = http
# frpc will send a GET request to '/status'
# and expect an HTTP 2xx OK response
health_check_url = /status
health_check_timeout_s = 3
health_check_max_failed = 3
health_check_interval_s = 10
Rewriting the HTTP Host Header
By default frp does not modify the tunneled HTTP requests at all as it's a byte-for-byte copy.
However, speaking of web servers and HTTP requests, your web server might rely on the Host HTTP header to determine the website to be accessed. frp can rewrite the Host header when forwarding the HTTP requests, with the host_header_rewrite field:
# frpc.ini
[web]
type = http
local_port = 80
custom_domains = test.example.com
host_header_rewrite = dev.example.com
The HTTP request will have the Host header rewritten to Host: dev.example.com when it reaches the actual web server, although the request from the browser probably has Host: test.example.com.
Setting other HTTP Headers
Similar to Host, You can override other HTTP request headers with proxy type http.
# frpc.ini
[web]
type = http
local_port = 80
custom_domains = test.example.com
host_header_rewrite = dev.example.com
header_X-From-Where = frp
Note that parameter(s) prefixed with header_ will be added to HTTP request headers.
In this example, it will set header X-From-Where: frp in the HTTP request.
Get Real IP
HTTP X-Forwarded-For
This feature is for http proxy only.
You can get user's real IP from HTTP request headers X-Forwarded-For.
Proxy Protocol
frp supports Proxy Protocol to send user's real IP to local services. It support all types except UDP.
Here is an example for https service:
# frpc.ini
[web]
type = https
local_port = 443
custom_domains = test.example.com

# now v1 and v2 are supported
proxy_protocol_version = v2
You can enable Proxy Protocol support in nginx to expose user's real IP in HTTP header X-Real-IP, and then read X-Real-IP header in your web service for the real IP.
Require HTTP Basic Auth (Password) for Web Services
Anyone who can guess your tunnel URL can access your local web server unless you protect it with a password.
This enforces HTTP Basic Auth on all requests with the username and password specified in frpc's configure file.
It can only be enabled when proxy type is http.
# frpc.ini
[web]
type = http
local_port = 80
custom_domains = test.example.com
http_user = abc
http_pwd = abc
Visit http://test.example.com in the browser and now you are prompted to enter the username and password.
Custom Subdomain Names
It is convenient to use subdomain configure for http and https types when many people share one frps server.
# frps.ini
subdomain_host = frps.com
Resolve *.frps.com to the frps server's IP. This is usually called a Wildcard DNS record.
# frpc.ini
[web]
type = http
local_port = 80
subdomain = test
Now you can visit your web service on test.frps.com.
Note that if subdomain_host is not empty, custom_domains should not be the subdomain of subdomain_host.
URL Routing
frp supports forwarding HTTP requests to different backend web services by url routing.
locations specifies the prefix of URL used for routing. frps first searches for the most specific prefix location given by literal strings regardless of the listed order.
# frpc.ini
[web01]
type = http
local_port = 80
custom_domains = web.example.com
locations = /

[web02]
type = http
local_port = 81
custom_domains = web.example.com
locations = /news,/about
HTTP requests with URL prefix /news or /about will be forwarded to web02 and other requests to web01.
TCP Port Multiplexing
frp supports receiving TCP sockets directed to different proxies on a single port on frps, similar to vhost_http_port and vhost_https_port.
The only supported TCP port multiplexing method available at the moment is httpconnect - HTTP CONNECT tunnel.
When setting tcpmux_httpconnect_port to anything other than 0 in frps under [common], frps will listen on this port for HTTP CONNECT requests.
The host of the HTTP CONNECT request will be used to match the proxy in frps. Proxy hosts can be configured in frpc by configuring custom_domain and / or subdomain under type = tcpmux proxies, when multiplexer = httpconnect.
例如:
# frps.ini
[common]
bind_port = 7000
tcpmux_httpconnect_port = 1337
# frpc.ini
[common]
server_addr = x.x.x.x
server_port = 7000

[proxy1]
type = tcpmux
multiplexer = httpconnect
custom_domains = test1
local_port = 80

[proxy2]
type = tcpmux
multiplexer = httpconnect
custom_domains = test2
local_port = 8080
In the above configuration - frps can be contacted on port 1337 with a HTTP CONNECT header such as:
CONNECT test1 HTTP/1.1\r\n\r\n
and the connection will be routed to proxy1.
Connecting to frps via HTTP PROXY
frpc can connect to frps using HTTP proxy if you set OS environment variable HTTP_PROXY, or if http_proxy is set in frpc.ini file.
It only works when protocol is tcp.
# frpc.ini
[common]
server_addr = x.x.x.x
server_port = 7000
http_proxy = http://user:pwd@192.168.1.128:8080
Range ports mapping
Proxy with names that start with range: will support mapping range ports.
# frpc.ini
[range:test_tcp]
type = tcp
local_ip = 127.0.0.1
local_port = 6000-6006,6007
remote_port = 6000-6006,6007
frpc will generate 8 proxies like test_tcp_0, test_tcp_1, ..., test_tcp_7.
Client Plugins
frpc only forwards requests to local TCP or UDP ports by default.
Plugins are used for providing rich features. There are built-in plugins such as unix_domain_socket, http_proxy, socks5, static_file, http2https, https2http, https2https and you can see example usage.
Specify which plugin to use with the plugin parameter. Configuration parameters of plugin should be started with plugin_. local_ip and local_port are not used for plugin.
Using plugin http_proxy:
# frpc.ini
[http_proxy]
type = tcp
remote_port = 6000
plugin = http_proxy
plugin_http_user = abc
plugin_http_passwd = abc
plugin_http_user and plugin_http_passwd are configuration parameters used in http_proxy plugin.
Server Manage Plugins
Read the document.
Find more plugins in gofrp/plugin.
Development Plan
- Log HTTP request information in frps.
贡献
Interested in getting involved? We would like to help you!
- Take a look at our issues list and consider sending a Pull Request to dev branch.
- If you want to add a new feature, please create an issue first to describe the new feature, as well as the implementation approach. Once a proposal is accepted, create an implementation of the new features and submit it as a pull request.
- Sorry for my poor English. Improvements for this document are welcome, even some typo fixes.
- If you have great ideas, send an email to fatedier@gmail.com.
Note: We prefer you to give your advise in issues, so others with a same question can search it quickly and we don't need to answer them repeatedly.
Donation
If frp helps you a lot, you can support us by:
GitHub Sponsors
Support us by Github Sponsors.
You can have your company's logo placed on README file of this project.
PayPal
Donate money by PayPal to my account fatedier@gmail.com.