1142 lines
32 KiB
Markdown
1142 lines
32 KiB
Markdown
# frp
|
||
|
||
[](https://circleci.com/gh/fatedier/frp) [](https://github.com/fatedier/frp/releases)
|
||
|
||
|
||
### 金牌赞助商
|
||
|
||
[](https://workos.com/?utm_campaign=github_repo&utm_medium=referral&utm_content=frp&utm_source=github) [](https://asocks.com/c/vDu6Dk)
|
||
|
||
## 什么是 frp?
|
||
|
||
frp 是一个快速的逆向代理,允许您将位于 NAT 或防火墙后面的本地服务器暴露给互联网。它目前支持 TCP 和 UDP,以及 HTTP 和 HTTPS 协议,使得请求可以通过域名转发到内部服务。
|
||
|
||
frp 还提供了一种 P2P 连接模式。
|
||
|
||
## 目录
|
||
|
||
* [frp](#frp)
|
||
* [什么是 frp?](#what-is-frp)
|
||
* [目录](#table-of-contents)
|
||
* [开发状态](#development-status)
|
||
* [架构](#architecture)
|
||
* [示例用法](#example-usage)
|
||
* [通过 SSH 访问局域网内的计算机](#access-your-computer-in-a-lan-network-via-ssh)
|
||
* [在局域网中通过自定义域名访问内部 Web 服务](#accessing-internal-web-services-with-custom-domains-in-lan)
|
||
* [正向 DNS 查询请求](#forward-dns-query-requests)
|
||
* [正向 Unix 域套接字](#forward-unix-domain-socket)
|
||
* [暴露一个简单的 HTTP 文件服务器](#expose-a-simple-http-file-server)
|
||
* [为本地 HTTP(S)服务启用 HTTPS](#enable-https-for-a-local-https-service)
|
||
* [私密地公开您的服务](#expose-your-service-privately)
|
||
* [点对点模式](#p2p-mode)
|
||
* [功能](#features)
|
||
* [配置文件](#configuration-files)
|
||
* [使用环境变量](#using-environment-variables)
|
||
* [将配置拆分到不同的文件中](#split-configures-into-different-files)
|
||
* [仪表板](#dashboard)
|
||
* [管理界面](#admin-ui)
|
||
* [监控](#monitor)
|
||
* [普罗米修斯](#prometheus)
|
||
* [客户端认证](#authenticating-the-client)
|
||
* [令牌认证](#token-authentication)
|
||
* [OIDC 身份验证](#oidc-authentication)
|
||
* [加密和压缩](#encryption-and-compression)
|
||
* [TLS](#tls)
|
||
* [热重载 frpc 配置](#hot-reloading-frpc-configuration)
|
||
* [从客户端获取代理状态](#get-proxy-status-from-client)
|
||
* [仅允许服务器上某些端口](#only-allowing-certain-ports-on-the-server)
|
||
* [端口重用](#port-reuse)
|
||
* [带宽限制](#bandwidth-limit)
|
||
* [对于每个代理](#for-each-proxy)
|
||
* [TCP 流复用](#tcp-stream-multiplexing)
|
||
* [支持 KCP 协议](#support-kcp-protocol)
|
||
* [支持 QUIC 协议](#support-quic-protocol)
|
||
* [连接池](#connection-pooling)
|
||
* [负载均衡](#load-balancing)
|
||
* [服务健康检查](#service-health-check)
|
||
* [重写 HTTP 主机头](#rewriting-the-http-host-header)
|
||
* [设置其他 HTTP 头](#setting-other-http-headers)
|
||
* [获取真实 IP](#get-real-ip)
|
||
* [HTTP X-Forwarded-For](#http-x-forwarded-for)
|
||
* [代理协议](#proxy-protocol)
|
||
* [需要为 Web 服务要求 HTTP 基本认证(密码)](#require-http-basic-auth-password-for-web-services)
|
||
* [自定义子域名](#custom-subdomain-names)
|
||
* [URL 路由](#url-routing)
|
||
* [TCP 端口复用](#tcp-port-multiplexing)
|
||
* [连接到 frps 通过 HTTP 代理](#connecting-to-frps-via-http-proxy)
|
||
* [端口映射范围](#range-ports-mapping)
|
||
* [客户端插件](#client-plugins)
|
||
* [服务器管理插件](#server-manage-plugins)
|
||
* [发展计划](#development-plan)
|
||
* [贡献](#contributing)
|
||
* [捐赠](#donation)
|
||
* [GitHub 赞助者](#github-sponsors)
|
||
* [PayPal](#paypal)
|
||
|
||
## 开发状态
|
||
|
||
frp 目前正在开发中。您可以在 `master` 分支尝试最新的发布版本,或者使用 `dev` 分支访问正在开发中的版本。
|
||
|
||
我们目前正在开发版本2,并尝试进行一些代码重构和改进。但是请注意,它将不与版本1兼容。
|
||
|
||
我们将从版本0过渡到版本1,届时将只接受错误修复和改进,而不是大的功能请求。
|
||
|
||
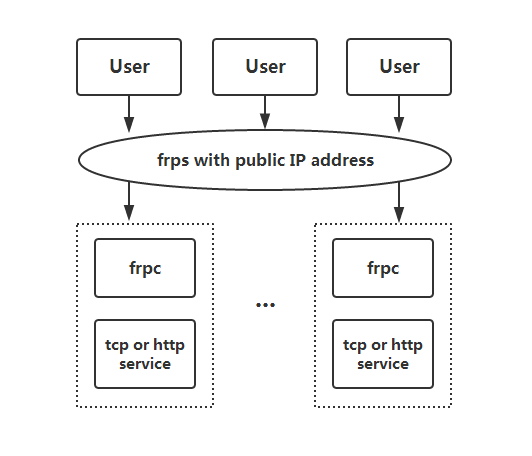
## 架构
|
||
|
||
|
||
|
||
## 示例用法
|
||
|
||
首先,从[发布](https://github.com/fatedier/frp/releases)页面下载适用于您操作系统和架构的最新程序。
|
||
|
||
接下来,将 `frps` 二进制文件和 `frps.ini` 配置文件放置在具有公网 IP 地址的服务器 A 上。
|
||
|
||
最后,将 `frpc` 二进制文件和 `frpc.ini` 配置文件放置在位于无法从公网直接访问的局域网上的服务器 B 上。
|
||
|
||
### 通过 SSH 在局域网内访问您的计算机
|
||
|
||
1. 在服务器 A 上修改 `frps.ini`,设置 `bind_port` 以便 frp 客户端连接:
|
||
|
||
```ini
|
||
# frps.ini
|
||
[common]
|
||
bind_port = 7000
|
||
```
|
||
|
||
2. 在服务器 A 上启动 `frps`:
|
||
|
||
`./frps -c ./frps.ini`
|
||
|
||
3. 在服务器 B 上修改 `frpc.ini`,并将 `server_addr` 字段设置为您的 frps 服务器的公网 IP 地址:
|
||
|
||
```ini
|
||
# frpc.ini
|
||
[common]
|
||
server_addr = x.x.x.x
|
||
server_port = 7000
|
||
|
||
[ssh]
|
||
type = tcp
|
||
local_ip = 127.0.0.1
|
||
local_port = 22
|
||
remote_port = 6000
|
||
```
|
||
|
||
请注意,`local_port`(客户端监听)和 `remote_port`(服务器上暴露)用于 frp 系统中的进出流量,而 `server_port` 用于 frps 和 frpc 之间的通信。
|
||
|
||
4. 在服务器 B 上启动 `frpc`:
|
||
|
||
`./frpc -c ./frpc.ini`
|
||
|
||
5. 要从另一台机器通过服务器 A 通过 SSH 访问服务器 B(假设用户名为 `test`),请使用以下命令:
|
||
|
||
`ssh -oPort=6000 test@x.x.x.x`
|
||
|
||
### 在局域网中使用自定义域名访问内部 Web 服务
|
||
|
||
有时我们需要将位于 NAT 网络背后的本地 Web 服务暴露给其他人,以便使用自己的域名进行测试。
|
||
|
||
不幸的是,我们无法将域名解析为本地 IP。然而,我们可以使用 frp 来暴露 HTTP(S)服务。
|
||
|
||
1. 修改 `frps.ini` 并将 vhost 的 HTTP 端口设置为 8080:
|
||
|
||
```ini
|
||
# frps.ini
|
||
[common]
|
||
bind_port = 7000
|
||
vhost_http_port = 8080
|
||
```
|
||
|
||
2. 启动 `frps`:
|
||
|
||
`./frps -c ./frps.ini`
|
||
|
||
3. 修改 `frpc.ini` 并将 `server_addr` 设置为远程 frps 服务器的 IP 地址。指定您的 Web 服务的 `local_port`:
|
||
|
||
```ini
|
||
# frpc.ini
|
||
[common]
|
||
server_addr = x.x.x.x
|
||
server_port = 7000
|
||
|
||
[web]
|
||
type = http
|
||
local_port = 80
|
||
custom_domains = www.example.com
|
||
```
|
||
|
||
4. 启动 `frpc`:
|
||
|
||
`./frpc -c ./frpc.ini`
|
||
|
||
5. 将 `www.example.com` 的 A 记录映射到远程 frps 服务器的公网 IP 地址或指向您原始域名的 CNAME 记录。
|
||
|
||
6. 使用 url `http://www.example.com:8080` 访问您的本地 Web 服务。
|
||
|
||
|
||
### 转发 DNS 查询请求
|
||
|
||
1. 修改 `frps.ini`:
|
||
|
||
```ini
|
||
# frps.ini
|
||
[common]
|
||
bind_port = 7000
|
||
```
|
||
|
||
2. 启动 `frps`:
|
||
|
||
`./frps -c ./frps.ini`
|
||
|
||
3. 修改 `frpc.ini` 并将 `server_addr` 设置为远程 frps 服务器的 IP 地址。将 DNS 查询请求转发到谷歌公共 DNS 服务器 `8.8.8.8:53`:
|
||
|
||
```ini
|
||
# frpc.ini
|
||
[common]
|
||
server_addr = x.x.x.x
|
||
server_port = 7000
|
||
|
||
[dns]
|
||
type = udp
|
||
local_ip = 8.8.8.8
|
||
local_port = 53
|
||
remote_port = 6000
|
||
```
|
||
|
||
4. 启动 frpc:
|
||
|
||
`./frpc -c ./frpc.ini`
|
||
|
||
5. 使用 `dig` 命令测试 DNS 解析:
|
||
|
||
`dig @x.x.x.x -p 6000 www.google.com`
|
||
|
||
### 转发 Unix 域套接字
|
||
|
||
将 Unix 域套接字(例如 Docker 守护进程套接字)暴露为 TCP。
|
||
|
||
配置 `frps` 如上所述。
|
||
|
||
1. 使用以下配置启动 `frpc`:
|
||
|
||
```ini
|
||
# frpc.ini
|
||
[common]
|
||
server_addr = x.x.x.x
|
||
server_port = 7000
|
||
|
||
[unix_domain_socket]
|
||
type = tcp
|
||
remote_port = 6000
|
||
plugin = unix_domain_socket
|
||
plugin_unix_path = /var/run/docker.sock
|
||
```
|
||
|
||
2. 使用 `curl` 获取 docker 版本以测试配置:
|
||
|
||
`curl http://x.x.x.x:6000/version`
|
||
|
||
### 公开一个简单的 HTTP 文件服务器
|
||
|
||
暴露一个简单的 HTTP 文件服务器,以便从公网访问局域网中存储的文件。
|
||
|
||
按照上述说明配置 `frps`,然后:
|
||
|
||
1. 使用以下配置启动 `frpc`:
|
||
|
||
```ini
|
||
# frpc.ini
|
||
[common]
|
||
server_addr = x.x.x.x
|
||
server_port = 7000
|
||
|
||
[test_static_file]
|
||
type = tcp
|
||
remote_port = 6000
|
||
plugin = static_file
|
||
plugin_local_path = /tmp/files
|
||
plugin_strip_prefix = static
|
||
plugin_http_user = abc
|
||
plugin_http_passwd = abc
|
||
```
|
||
|
||
2. 使用浏览器访问 `http://x.x.x.x:6000/static/`,并指定正确的用户名和密码,以查看 `frpc` 机器上的 `/tmp/files` 目录中的文件。
|
||
|
||
### 启用本地 HTTP(S)服务的 HTTPS
|
||
|
||
您可以将插件中的 `https2https` 替换,并将 `plugin_local_addr` 指向一个 HTTPS 端点。
|
||
|
||
1. 使用以下配置启动 `frpc`:
|
||
|
||
```ini
|
||
# frpc.ini
|
||
[common]
|
||
server_addr = x.x.x.x
|
||
server_port = 7000
|
||
|
||
[test_https2http]
|
||
type = https
|
||
custom_domains = test.example.com
|
||
|
||
plugin = https2http
|
||
plugin_local_addr = 127.0.0.1:80
|
||
plugin_crt_path = ./server.crt
|
||
plugin_key_path = ./server.key
|
||
plugin_host_header_rewrite = 127.0.0.1
|
||
plugin_header_X-From-Where = frp
|
||
```
|
||
|
||
2. 访问 `https://test.example.com`。
|
||
|
||
### 私密地公开您的服务
|
||
|
||
为了减轻直接将某些服务暴露给公共网络所带来的风险,STCP(秘密 TCP)模式要求使用预共享密钥,以便其他客户端访问该服务。
|
||
|
||
配置与上述相同的 `frps`。
|
||
|
||
1. 在机器 B 上使用以下配置启动 `frpc`。此示例用于公开 SSH 服务(端口 22),请注意预共享密钥的字段 `sk`,以及这里已移除的 `remote_port` 字段:
|
||
|
||
```ini
|
||
# frpc.ini
|
||
[common]
|
||
server_addr = x.x.x.x
|
||
server_port = 7000
|
||
|
||
[secret_ssh]
|
||
type = stcp
|
||
sk = abcdefg
|
||
local_ip = 127.0.0.1
|
||
local_port = 22
|
||
```
|
||
|
||
2. 启动另一个 `frpc`(通常在另一台机器 C 上)以以下配置使用安全密钥(`sk` 字段)访问 SSH 服务:
|
||
|
||
```ini
|
||
# frpc.ini
|
||
[common]
|
||
server_addr = x.x.x.x
|
||
server_port = 7000
|
||
|
||
[secret_ssh_visitor]
|
||
type = stcp
|
||
role = visitor
|
||
server_name = secret_ssh
|
||
sk = abcdefg
|
||
bind_addr = 127.0.0.1
|
||
bind_port = 6000
|
||
```
|
||
|
||
3. 在机器 C 上,使用以下命令连接到机器 B 的 SSH:
|
||
|
||
`ssh -oPort=6000 127.0.0.1`
|
||
|
||
### P2P 模式
|
||
|
||
**xtcp** 旨在在客户端之间直接传输大量数据。仍然需要一个 frps 服务器,因为这里的 P2P 仅指实际的数据传输。
|
||
|
||
Note that it may not work with all types of NAT devices. You might want to fallback to stcp if xtcp doesn't work.
|
||
|
||
1. In `frps.ini` configure a UDP port for xtcp:
|
||
|
||
```ini
|
||
# frps.ini
|
||
bind_udp_port = 7001
|
||
```
|
||
|
||
2. Start `frpc` on machine B, and expose the SSH port. Note that the `remote_port` field is removed:
|
||
|
||
```ini
|
||
# frpc.ini
|
||
[common]
|
||
server_addr = x.x.x.x
|
||
server_port = 7000
|
||
|
||
[p2p_ssh]
|
||
type = xtcp
|
||
sk = abcdefg
|
||
local_ip = 127.0.0.1
|
||
local_port = 22
|
||
```
|
||
|
||
3. Start another `frpc` (typically on another machine C) with the configuration to connect to SSH using P2P mode:
|
||
|
||
```ini
|
||
# frpc.ini
|
||
[common]
|
||
server_addr = x.x.x.x
|
||
server_port = 7000
|
||
|
||
[p2p_ssh_visitor]
|
||
type = xtcp
|
||
role = visitor
|
||
server_name = p2p_ssh
|
||
sk = abcdefg
|
||
bind_addr = 127.0.0.1
|
||
bind_port = 6000
|
||
```
|
||
|
||
4. 在机器 C 上,使用以下命令连接到机器 B 的 SSH:
|
||
|
||
`ssh -oPort=6000 127.0.0.1`
|
||
|
||
## 功能
|
||
|
||
### 配置文件
|
||
|
||
阅读完整的示例配置文件,以了解更多此处未描述的功能。
|
||
|
||
[frps(服务器)的完整配置文件](./conf/frps_full.ini)
|
||
|
||
[frpc(客户端)完整配置文件](./conf/frpc_full.ini)
|
||
|
||
### 使用环境变量
|
||
|
||
配置文件中可以使用 Go 的标准格式引用环境变量:
|
||
|
||
```ini
|
||
# frpc.ini
|
||
[common]
|
||
server_addr = {{ .Envs.FRP_SERVER_ADDR }}
|
||
server_port = 7000
|
||
|
||
[ssh]
|
||
type = tcp
|
||
local_ip = 127.0.0.1
|
||
local_port = 22
|
||
remote_port = {{ .Envs.FRP_SSH_REMOTE_PORT }}
|
||
```
|
||
|
||
使用上述配置,可以将变量传递给 `frpc` 程序,如下所示:
|
||
|
||
```
|
||
export FRP_SERVER_ADDR="x.x.x.x"
|
||
export FRP_SSH_REMOTE_PORT="6000"
|
||
./frpc -c ./frpc.ini
|
||
```
|
||
|
||
`frpc` 将使用操作系统环境变量渲染配置文件模板。请记住,在您的引用前加上 `.Envs`。
|
||
|
||
### 将配置文件拆分为不同的文件
|
||
|
||
您可以将多个代理配置拆分为不同的文件,并在主文件中包含它们。
|
||
|
||
```ini
|
||
# frpc.ini
|
||
[common]
|
||
server_addr = x.x.x.x
|
||
server_port = 7000
|
||
includes=./confd/*.ini
|
||
```
|
||
|
||
```ini
|
||
# ./confd/test.ini
|
||
[ssh]
|
||
type = tcp
|
||
local_ip = 127.0.0.1
|
||
local_port = 22
|
||
remote_port = 6000
|
||
```
|
||
|
||
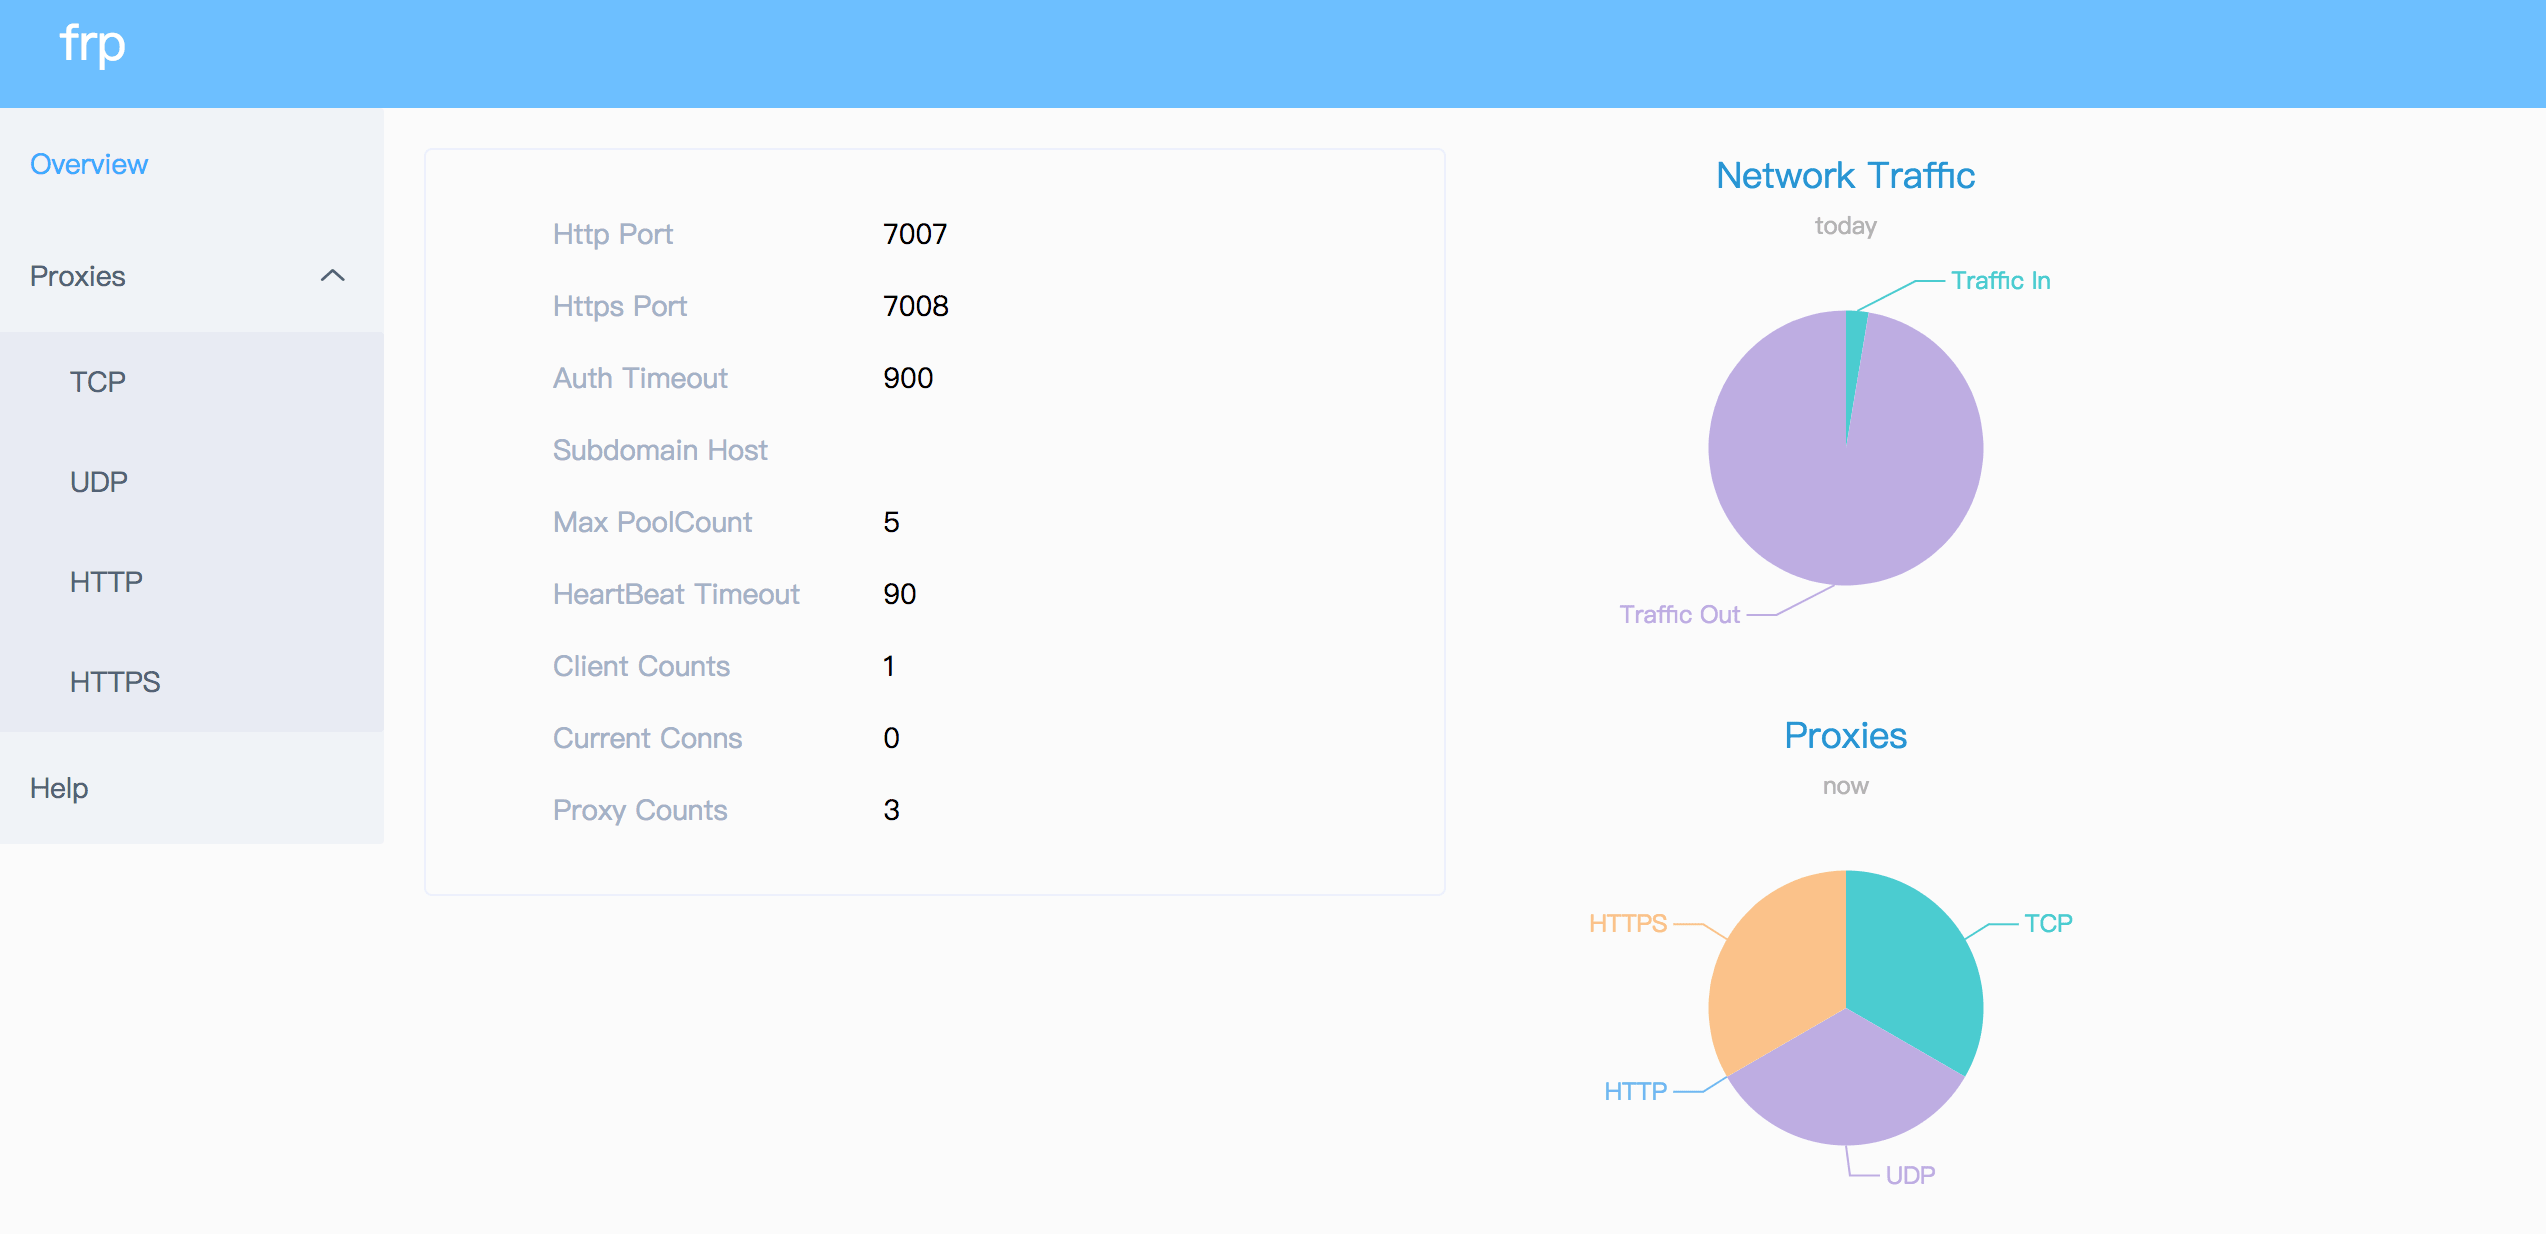
### 仪表板
|
||
|
||
通过仪表板检查 frp 的状态和代理的统计信息。
|
||
|
||
配置仪表板的端口以启用此功能:
|
||
|
||
```ini
|
||
[common]
|
||
dashboard_port = 7500
|
||
# dashboard's username and password are both optional
|
||
dashboard_user = admin
|
||
dashboard_pwd = admin
|
||
```
|
||
|
||
然后访问 `http://[服务器地址]:7500` 查看仪表板,用户名和密码均为 `admin`。
|
||
|
||
此外,您还可以通过使用您的域名通配符或普通 SSL 证书来使用 HTTPS 端口:
|
||
|
||
```ini
|
||
[common]
|
||
dashboard_port = 7500
|
||
# dashboard's username and password are both optional
|
||
dashboard_user = admin
|
||
dashboard_pwd = admin
|
||
dashboard_tls_mode = true
|
||
dashboard_tls_cert_file = server.crt
|
||
dashboard_tls_key_file = server.key
|
||
```
|
||
|
||
然后访问 `https://[服务器地址]:7500` 以安全 HTTPS 连接查看仪表板,用户名和密码均为 `admin`。
|
||
|
||
|
||
|
||
### 管理员界面
|
||
|
||
管理员界面帮助您检查和管理 frpc 的配置。
|
||
|
||
配置管理员界面的地址以启用此功能:
|
||
|
||
```ini
|
||
[common]
|
||
admin_addr = 127.0.0.1
|
||
admin_port = 7400
|
||
admin_user = admin
|
||
admin_pwd = admin
|
||
```
|
||
|
||
然后访问 `http://127.0.0.1:7400` 查看管理界面,用户名和密码都为 `admin`。
|
||
|
||
### 监控
|
||
|
||
当启用仪表板时,frps 将监控数据保存在缓存中。进程重启后将被清除。
|
||
|
||
也支持 Prometheus。
|
||
|
||
#### Prometheus
|
||
|
||
首先启用仪表板,然后在 `frps.ini` 中配置 `enable_prometheus = true`。
|
||
|
||
`http://{dashboard_addr}/metrics` 将提供 Prometheus 监控数据。
|
||
|
||
### 客户端认证
|
||
|
||
有 2 种认证方法用于认证 frpc 与 frps。
|
||
|
||
You can decide which one to use by configuring `authentication_method` under `[common]` in `frpc.ini` and `frps.ini`.
|
||
|
||
Configuring `authenticate_heartbeats = true` under `[common]` will use the configured authentication method to add and validate authentication on every heartbeat between frpc and frps.
|
||
|
||
Configuring `authenticate_new_work_conns = true` under `[common]` will do the same for every new work connection between frpc and frps.
|
||
|
||
#### Token Authentication
|
||
|
||
When specifying `authentication_method = token` under `[common]` in `frpc.ini` and `frps.ini` - token based authentication will be used.
|
||
|
||
Make sure to specify the same `token` in the `[common]` section in `frps.ini` and `frpc.ini` for frpc to pass frps validation
|
||
|
||
#### OIDC Authentication
|
||
|
||
When specifying `authentication_method = oidc` under `[common]` in `frpc.ini` and `frps.ini` - OIDC based authentication will be used.
|
||
|
||
OIDC 代表 OpenID Connect,所使用的流程称为[客户端凭证授权](https://tools.ietf.org/html/rfc6749#section-4.4) 。
|
||
|
||
要使用此认证类型 - 按照以下方式配置 `frpc.ini` 和 `frps.ini`:
|
||
|
||
```ini
|
||
# frps.ini
|
||
[common]
|
||
authentication_method = oidc
|
||
oidc_issuer = https://example-oidc-issuer.com/
|
||
oidc_audience = https://oidc-audience.com/.default
|
||
```
|
||
|
||
```ini
|
||
# frpc.ini
|
||
[common]
|
||
authentication_method = oidc
|
||
oidc_client_id = 98692467-37de-409a-9fac-bb2585826f18 # Replace with OIDC client ID
|
||
oidc_client_secret = oidc_secret
|
||
oidc_audience = https://oidc-audience.com/.default
|
||
oidc_token_endpoint_url = https://example-oidc-endpoint.com/oauth2/v2.0/token
|
||
```
|
||
|
||
### 加密和压缩
|
||
|
||
这些功能默认是关闭的。您可以选择开启加密和/或压缩:
|
||
|
||
```ini
|
||
# frpc.ini
|
||
[ssh]
|
||
type = tcp
|
||
local_port = 22
|
||
remote_port = 6000
|
||
use_encryption = true
|
||
use_compression = true
|
||
```
|
||
|
||
#### TLS
|
||
|
||
frp supports the TLS protocol between `frpc` and `frps` since v0.25.0.
|
||
|
||
For port multiplexing, frp sends a first byte `0x17` to dial a TLS connection.
|
||
|
||
Configure `tls_enable = true` in the `[common]` section to `frpc.ini` to enable this feature.
|
||
|
||
To **enforce** `frps` to only accept TLS connections - configure `tls_only = true` in the `[common]` section in `frps.ini`. **This is optional.**
|
||
|
||
**`frpc` TLS settings (under the `[common]` section):**
|
||
|
||
```ini
|
||
tls_enable = true
|
||
tls_cert_file = certificate.crt
|
||
tls_key_file = certificate.key
|
||
tls_trusted_ca_file = ca.crt
|
||
```
|
||
|
||
**`frps` TLS settings (under the `[common]` section):**
|
||
|
||
```ini
|
||
tls_only = true
|
||
tls_enable = true
|
||
tls_cert_file = certificate.crt
|
||
tls_key_file = certificate.key
|
||
tls_trusted_ca_file = ca.crt
|
||
```
|
||
|
||
You will need **a root CA cert** and **at least one SSL/TLS certificate**. It **can** be self-signed or regular (such as Let's Encrypt or another SSL/TLS certificate provider).
|
||
|
||
If you using `frp` via IP address and not hostname, make sure to set the appropriate IP address in the Subject Alternative Name (SAN) area when generating SSL/TLS Certificates.
|
||
|
||
Given an example:
|
||
|
||
* Prepare openssl config file. It exists at `/etc/pki/tls/openssl.cnf` in Linux System and `/System/Library/OpenSSL/openssl.cnf` in MacOS, and you can copy it to current path, like `cp /etc/pki/tls/openssl.cnf ./my-openssl.cnf`. If not, you can build it by yourself, like:
|
||
|
||
```
|
||
cat > my-openssl.cnf << EOF
|
||
[ ca ]
|
||
default_ca = CA_default
|
||
[ CA_default ]
|
||
x509_extensions = usr_cert
|
||
[ req ]
|
||
default_bits = 2048
|
||
default_md = sha256
|
||
default_keyfile = privkey.pem
|
||
distinguished_name = req_distinguished_name
|
||
attributes = req_attributes
|
||
x509_extensions = v3_ca
|
||
string_mask = utf8only
|
||
[ req_distinguished_name ]
|
||
[ req_attributes ]
|
||
[ usr_cert ]
|
||
basicConstraints = CA:FALSE
|
||
nsComment = "OpenSSL Generated Certificate"
|
||
subjectKeyIdentifier = hash
|
||
authorityKeyIdentifier = keyid,issuer
|
||
[ v3_ca ]
|
||
subjectKeyIdentifier = hash
|
||
authorityKeyIdentifier = keyid:always,issuer
|
||
basicConstraints = CA:true
|
||
EOF
|
||
```
|
||
|
||
* build ca certificates:
|
||
|
||
```
|
||
openssl genrsa -out ca.key 2048
|
||
openssl req -x509 -new -nodes -key ca.key -subj "/CN=example.ca.com" -days 5000 -out ca.crt
|
||
```
|
||
|
||
* 构建 frps 证书:
|
||
|
||
```
|
||
openssl genrsa -out server.key 2048
|
||
|
||
openssl req -new -sha256 -key server.key \
|
||
-subj "/C=XX/ST=DEFAULT/L=DEFAULT/O=DEFAULT/CN=server.com" \
|
||
-reqexts SAN \
|
||
-config <(cat my-openssl.cnf <(printf "\n[SAN]\nsubjectAltName=DNS:localhost,IP:127.0.0.1,DNS:example.server.com")) \
|
||
-out server.csr
|
||
|
||
openssl x509 -req -days 365 -sha256 \
|
||
-in server.csr -CA ca.crt -CAkey ca.key -CAcreateserial \
|
||
-extfile <(printf "subjectAltName=DNS:localhost,IP:127.0.0.1,DNS:example.server.com") \
|
||
-out server.crt
|
||
```
|
||
|
||
* 构建 frpc 证书:
|
||
|
||
```
|
||
openssl genrsa -out client.key 2048
|
||
openssl req -new -sha256 -key client.key \
|
||
-subj "/C=XX/ST=DEFAULT/L=DEFAULT/O=DEFAULT/CN=client.com" \
|
||
-reqexts SAN \
|
||
-config <(cat my-openssl.cnf <(printf "\n[SAN]\nsubjectAltName=DNS:client.com,DNS:example.client.com")) \
|
||
-out client.csr
|
||
|
||
openssl x509 -req -days 365 -sha256 \
|
||
-in client.csr -CA ca.crt -CAkey ca.key -CAcreateserial \
|
||
-extfile <(printf "subjectAltName=DNS:client.com,DNS:example.client.com") \
|
||
-out client.crt
|
||
```
|
||
|
||
### 热重载 frpc 配置
|
||
|
||
要启用 HTTP API,需要填写 `admin_addr` 和 `admin_port` 字段
|
||
|
||
```ini
|
||
# frpc.ini
|
||
[common]
|
||
admin_addr = 127.0.0.1
|
||
admin_port = 7400
|
||
```
|
||
|
||
Then run command `frpc reload -c ./frpc.ini` and wait for about 10 seconds to let `frpc` create or update or remove proxies.
|
||
|
||
**Note that parameters in \[common\] section won't be modified except 'start'.**
|
||
|
||
You can run command `frpc verify -c ./frpc.ini` before reloading to check if there are config errors.
|
||
|
||
### Get proxy status from client
|
||
|
||
Use `frpc status -c ./frpc.ini` to get status of all proxies. The `admin_addr` and `admin_port` fields are required for enabling HTTP API.
|
||
|
||
### Only allowing certain ports on the server
|
||
|
||
`allow_ports` in `frps.ini` is used to avoid abuse of ports:
|
||
|
||
```ini
|
||
# frps.ini
|
||
[common]
|
||
allow_ports = 2000-3000,3001,3003,4000-50000
|
||
```
|
||
|
||
`allow_ports` consists of specific ports or port ranges (lowest port number, dash `-`, highest port number), separated by comma `,`.
|
||
|
||
### Port Reuse
|
||
|
||
`vhost_http_port` and `vhost_https_port` in frps can use same port with `bind_port`. frps will detect the connection's protocol and handle it correspondingly.
|
||
|
||
We would like to try to allow multiple proxies bind a same remote port with different protocols in the future.
|
||
|
||
### Bandwidth Limit
|
||
|
||
#### For Each Proxy
|
||
|
||
```ini
|
||
# frpc.ini
|
||
[ssh]
|
||
type = tcp
|
||
local_port = 22
|
||
remote_port = 6000
|
||
bandwidth_limit = 1MB
|
||
```
|
||
|
||
Set `bandwidth_limit` in each proxy's configure to enable this feature. Supported units are `MB` and `KB`.
|
||
|
||
Set `bandwidth_limit_mode` to `client` or `server` to limit bandwidth on the client or server side. Default is `client`.
|
||
|
||
### TCP Stream Multiplexing
|
||
|
||
frp supports tcp stream multiplexing since v0.10.0 like HTTP2 Multiplexing, in which case all logic connections to the same frpc are multiplexed into the same TCP connection.
|
||
|
||
You can disable this feature by modify `frps.ini` and `frpc.ini`:
|
||
|
||
```ini
|
||
# frps.ini and frpc.ini, must be same
|
||
[common]
|
||
tcp_mux = false
|
||
```
|
||
|
||
### Support KCP Protocol
|
||
|
||
KCP is a fast and reliable protocol that can achieve the transmission effect of a reduction of the average latency by 30% to 40% and reduction of the maximum delay by a factor of three, at the cost of 10% to 20% more bandwidth wasted than TCP.
|
||
|
||
KCP mode uses UDP as the underlying transport. Using KCP in frp:
|
||
|
||
1. Enable KCP in frps:
|
||
|
||
```ini
|
||
# frps.ini
|
||
[common]
|
||
bind_port = 7000
|
||
# Specify a UDP port for KCP.
|
||
kcp_bind_port = 7000
|
||
```
|
||
|
||
The `kcp_bind_port` number can be the same number as `bind_port`, since `bind_port` field specifies a TCP port.
|
||
|
||
2. Configure `frpc.ini` to use KCP to connect to frps:
|
||
|
||
```ini
|
||
# frpc.ini
|
||
[common]
|
||
server_addr = x.x.x.x
|
||
# Same as the 'kcp_bind_port' in frps.ini
|
||
server_port = 7000
|
||
protocol = kcp
|
||
```
|
||
|
||
### Support QUIC Protocol
|
||
|
||
QUIC is a new multiplexed transport built on top of UDP.
|
||
|
||
Using QUIC in frp:
|
||
|
||
1. Enable QUIC in frps:
|
||
|
||
```ini
|
||
# frps.ini
|
||
[common]
|
||
bind_port = 7000
|
||
# Specify a UDP port for QUIC.
|
||
quic_bind_port = 7000
|
||
```
|
||
|
||
The `quic_bind_port` number can be the same number as `bind_port`, since `bind_port` field specifies a TCP port.
|
||
|
||
2. Configure `frpc.ini` to use QUIC to connect to frps:
|
||
|
||
```ini
|
||
# frpc.ini
|
||
[common]
|
||
server_addr = x.x.x.x
|
||
# Same as the 'quic_bind_port' in frps.ini
|
||
server_port = 7000
|
||
protocol = quic
|
||
```
|
||
|
||
### Connection Pooling
|
||
|
||
By default, frps creates a new frpc connection to the backend service upon a user request. With connection pooling, frps keeps a certain number of pre-established connections, reducing the time needed to establish a connection.
|
||
|
||
This feature is suitable for a large number of short connections.
|
||
|
||
1. Configure the limit of pool count each proxy can use in `frps.ini`:
|
||
|
||
```ini
|
||
# frps.ini
|
||
[common]
|
||
max_pool_count = 5
|
||
```
|
||
|
||
2. Enable and specify the number of connection pool:
|
||
|
||
```ini
|
||
# frpc.ini
|
||
[common]
|
||
pool_count = 1
|
||
```
|
||
|
||
### Load balancing
|
||
|
||
Load balancing is supported by `group`.
|
||
|
||
This feature is only available for types `tcp`, `http`, `tcpmux` now.
|
||
|
||
```ini
|
||
# frpc.ini
|
||
[test1]
|
||
type = tcp
|
||
local_port = 8080
|
||
remote_port = 80
|
||
group = web
|
||
group_key = 123
|
||
|
||
[test2]
|
||
type = tcp
|
||
local_port = 8081
|
||
remote_port = 80
|
||
group = web
|
||
group_key = 123
|
||
```
|
||
|
||
`group_key` is used for authentication.
|
||
|
||
Connections to port 80 will be dispatched to proxies in the same group randomly.
|
||
|
||
For type `tcp`, `remote_port` in the same group should be the same.
|
||
|
||
For type `http`, `custom_domains`, `subdomain`, `locations` should be the same.
|
||
|
||
### Service Health Check
|
||
|
||
Health check feature can help you achieve high availability with load balancing.
|
||
|
||
Add `health_check_type = tcp` or `health_check_type = http` to enable health check.
|
||
|
||
With health check type **tcp**, the service port will be pinged (TCPing):
|
||
|
||
```ini
|
||
# frpc.ini
|
||
[test1]
|
||
type = tcp
|
||
local_port = 22
|
||
remote_port = 6000
|
||
# Enable TCP health check
|
||
health_check_type = tcp
|
||
# TCPing timeout seconds
|
||
health_check_timeout_s = 3
|
||
# If health check failed 3 times in a row, the proxy will be removed from frps
|
||
health_check_max_failed = 3
|
||
# A health check every 10 seconds
|
||
health_check_interval_s = 10
|
||
```
|
||
|
||
With health check type **http**, an HTTP request will be sent to the service and an HTTP 2xx OK response is expected:
|
||
|
||
```ini
|
||
# frpc.ini
|
||
[web]
|
||
type = http
|
||
local_ip = 127.0.0.1
|
||
local_port = 80
|
||
custom_domains = test.example.com
|
||
# Enable HTTP health check
|
||
health_check_type = http
|
||
# frpc will send a GET request to '/status'
|
||
# and expect an HTTP 2xx OK response
|
||
health_check_url = /status
|
||
health_check_timeout_s = 3
|
||
health_check_max_failed = 3
|
||
health_check_interval_s = 10
|
||
```
|
||
|
||
### Rewriting the HTTP Host Header
|
||
|
||
By default frp does not modify the tunneled HTTP requests at all as it's a byte-for-byte copy.
|
||
|
||
However, speaking of web servers and HTTP requests, your web server might rely on the `Host` HTTP header to determine the website to be accessed. frp can rewrite the `Host` header when forwarding the HTTP requests, with the `host_header_rewrite` field:
|
||
|
||
```ini
|
||
# frpc.ini
|
||
[web]
|
||
type = http
|
||
local_port = 80
|
||
custom_domains = test.example.com
|
||
host_header_rewrite = dev.example.com
|
||
```
|
||
|
||
The HTTP request will have the `Host` header rewritten to `Host: dev.example.com` when it reaches the actual web server, although the request from the browser probably has `Host: test.example.com`.
|
||
|
||
### Setting other HTTP Headers
|
||
|
||
Similar to `Host`, You can override other HTTP request headers with proxy type `http`.
|
||
|
||
```ini
|
||
# frpc.ini
|
||
[web]
|
||
type = http
|
||
local_port = 80
|
||
custom_domains = test.example.com
|
||
host_header_rewrite = dev.example.com
|
||
header_X-From-Where = frp
|
||
```
|
||
|
||
Note that parameter(s) prefixed with `header_` will be added to HTTP request headers.
|
||
|
||
In this example, it will set header `X-From-Where: frp` in the HTTP request.
|
||
|
||
### Get Real IP
|
||
|
||
#### HTTP X-Forwarded-For
|
||
|
||
This feature is for http proxy only.
|
||
|
||
You can get user's real IP from HTTP request headers `X-Forwarded-For`.
|
||
|
||
#### Proxy Protocol
|
||
|
||
frp supports Proxy Protocol to send user's real IP to local services. It support all types except UDP.
|
||
|
||
Here is an example for https service:
|
||
|
||
```ini
|
||
# frpc.ini
|
||
[web]
|
||
type = https
|
||
local_port = 443
|
||
custom_domains = test.example.com
|
||
|
||
# now v1 and v2 are supported
|
||
proxy_protocol_version = v2
|
||
```
|
||
|
||
You can enable Proxy Protocol support in nginx to expose user's real IP in HTTP header `X-Real-IP`, and then read `X-Real-IP` header in your web service for the real IP.
|
||
|
||
### Require HTTP Basic Auth (Password) for Web Services
|
||
|
||
Anyone who can guess your tunnel URL can access your local web server unless you protect it with a password.
|
||
|
||
This enforces HTTP Basic Auth on all requests with the username and password specified in frpc's configure file.
|
||
|
||
It can only be enabled when proxy type is http.
|
||
|
||
```ini
|
||
# frpc.ini
|
||
[web]
|
||
type = http
|
||
local_port = 80
|
||
custom_domains = test.example.com
|
||
http_user = abc
|
||
http_pwd = abc
|
||
```
|
||
|
||
Visit `http://test.example.com` in the browser and now you are prompted to enter the username and password.
|
||
|
||
### Custom Subdomain Names
|
||
|
||
It is convenient to use `subdomain` configure for http and https types when many people share one frps server.
|
||
|
||
```ini
|
||
# frps.ini
|
||
subdomain_host = frps.com
|
||
```
|
||
|
||
Resolve `*.frps.com` to the frps server's IP. This is usually called a Wildcard DNS record.
|
||
|
||
```ini
|
||
# frpc.ini
|
||
[web]
|
||
type = http
|
||
local_port = 80
|
||
subdomain = test
|
||
```
|
||
|
||
Now you can visit your web service on `test.frps.com`.
|
||
|
||
Note that if `subdomain_host` is not empty, `custom_domains` should not be the subdomain of `subdomain_host`.
|
||
|
||
### URL Routing
|
||
|
||
frp supports forwarding HTTP requests to different backend web services by url routing.
|
||
|
||
`locations` specifies the prefix of URL used for routing. frps first searches for the most specific prefix location given by literal strings regardless of the listed order.
|
||
|
||
```ini
|
||
# frpc.ini
|
||
[web01]
|
||
type = http
|
||
local_port = 80
|
||
custom_domains = web.example.com
|
||
locations = /
|
||
|
||
[web02]
|
||
type = http
|
||
local_port = 81
|
||
custom_domains = web.example.com
|
||
locations = /news,/about
|
||
```
|
||
|
||
HTTP requests with URL prefix `/news` or `/about` will be forwarded to **web02** and other requests to **web01**.
|
||
|
||
### TCP Port Multiplexing
|
||
|
||
frp supports receiving TCP sockets directed to different proxies on a single port on frps, similar to `vhost_http_port` and `vhost_https_port`.
|
||
|
||
The only supported TCP port multiplexing method available at the moment is `httpconnect` - HTTP CONNECT tunnel.
|
||
|
||
When setting `tcpmux_httpconnect_port` to anything other than 0 in frps under `[common]`, frps will listen on this port for HTTP CONNECT requests.
|
||
|
||
The host of the HTTP CONNECT request will be used to match the proxy in frps. Proxy hosts can be configured in frpc by configuring `custom_domain` and / or `subdomain` under `type = tcpmux` proxies, when `multiplexer = httpconnect`.
|
||
|
||
例如:
|
||
|
||
```ini
|
||
# frps.ini
|
||
[common]
|
||
bind_port = 7000
|
||
tcpmux_httpconnect_port = 1337
|
||
```
|
||
|
||
```ini
|
||
# frpc.ini
|
||
[common]
|
||
server_addr = x.x.x.x
|
||
server_port = 7000
|
||
|
||
[proxy1]
|
||
type = tcpmux
|
||
multiplexer = httpconnect
|
||
custom_domains = test1
|
||
local_port = 80
|
||
|
||
[proxy2]
|
||
type = tcpmux
|
||
multiplexer = httpconnect
|
||
custom_domains = test2
|
||
local_port = 8080
|
||
```
|
||
|
||
In the above configuration - frps can be contacted on port 1337 with a HTTP CONNECT header such as:
|
||
|
||
```
|
||
CONNECT test1 HTTP/1.1\r\n\r\n
|
||
```
|
||
|
||
and the connection will be routed to `proxy1`.
|
||
|
||
### Connecting to frps via HTTP PROXY
|
||
|
||
frpc can connect to frps using HTTP proxy if you set OS environment variable `HTTP_PROXY`, or if `http_proxy` is set in frpc.ini file.
|
||
|
||
It only works when protocol is tcp.
|
||
|
||
```ini
|
||
# frpc.ini
|
||
[common]
|
||
server_addr = x.x.x.x
|
||
server_port = 7000
|
||
http_proxy = http://user:pwd@192.168.1.128:8080
|
||
```
|
||
|
||
### Range ports mapping
|
||
|
||
Proxy with names that start with `range:` will support mapping range ports.
|
||
|
||
```ini
|
||
# frpc.ini
|
||
[range:test_tcp]
|
||
type = tcp
|
||
local_ip = 127.0.0.1
|
||
local_port = 6000-6006,6007
|
||
remote_port = 6000-6006,6007
|
||
```
|
||
|
||
frpc will generate 8 proxies like `test_tcp_0`, `test_tcp_1`, ..., `test_tcp_7`.
|
||
|
||
### Client Plugins
|
||
|
||
frpc only forwards requests to local TCP or UDP ports by default.
|
||
|
||
Plugins are used for providing rich features. There are built-in plugins such as `unix_domain_socket`, `http_proxy`, `socks5`, `static_file`, `http2https`, `https2http`, `https2https` and you can see [example usage](#example-usage).
|
||
|
||
Specify which plugin to use with the `plugin` parameter. Configuration parameters of plugin should be started with `plugin_`. `local_ip` and `local_port` are not used for plugin.
|
||
|
||
Using plugin **http\_proxy**:
|
||
|
||
```ini
|
||
# frpc.ini
|
||
[http_proxy]
|
||
type = tcp
|
||
remote_port = 6000
|
||
plugin = http_proxy
|
||
plugin_http_user = abc
|
||
plugin_http_passwd = abc
|
||
```
|
||
|
||
`plugin_http_user` and `plugin_http_passwd` are configuration parameters used in `http_proxy` plugin.
|
||
|
||
### Server Manage Plugins
|
||
|
||
Read the [document](/doc/server_plugin.md).
|
||
|
||
Find more plugins in [gofrp/plugin](https://github.com/gofrp/plugin).
|
||
|
||
## Development Plan
|
||
|
||
* Log HTTP request information in frps.
|
||
|
||
## 贡献
|
||
|
||
Interested in getting involved? We would like to help you!
|
||
|
||
* Take a look at our [issues list](https://github.com/fatedier/frp/issues) and consider sending a Pull Request to **dev branch**.
|
||
* If you want to add a new feature, please create an issue first to describe the new feature, as well as the implementation approach. Once a proposal is accepted, create an implementation of the new features and submit it as a pull request.
|
||
* Sorry for my poor English. Improvements for this document are welcome, even some typo fixes.
|
||
* If you have great ideas, send an email to [fatedier@gmail.com](mailto:fatedier@gmail.com).
|
||
|
||
**Note: We prefer you to give your advise in [issues](https://github.com/fatedier/frp/issues), so others with a same question can search it quickly and we don't need to answer them repeatedly.**
|
||
|
||
## Donation
|
||
|
||
If frp helps you a lot, you can support us by:
|
||
|
||
### GitHub Sponsors
|
||
|
||
Support us by [Github Sponsors](https://github.com/sponsors/fatedier).
|
||
|
||
You can have your company's logo placed on README file of this project.
|
||
|
||
### PayPal
|
||
|
||
Donate money by [PayPal](https://www.paypal.me/fatedier) to my account **[fatedier@gmail.com](mailto:fatedier@gmail.com)**. |